The Americans believe that they invented a barbecue, although they admit that the Spanish conquistadors spied on the process of cooking meat on an open fire from the Peruvian Indians. However, the word barbecue (barbecue or bbq) is of English origin and translates as cooking over an open fire. In the mid-twentieth century, a spherical grill boiler was invented, after which a barbecue appeared in vogue. The brick barbecue stove has become extremely popular. About 100 thousand stationary barbecues are built annually in Russia and 900 thousand portable ones are sold.
Choosing the right stove for a summer residence
When choosing a barbecue oven for a summer residence, you need to carefully weigh not only your needs, but also the real possibilities. The following factors will significantly influence the choice:
- Available barbecue area. As a rule, the stove is installed on the site in front of the cottage or country house. However, for this purpose, the territory of the site can also be used. The stove can even become part of the gazebo.
- Financial opportunities of the future barbecue owner. If you choose the mobile version, then for several thousand rubles a portable or wheel-mounted device will be yours. A stationary brick or stone stove will cost significantly more. Especially if you have to turn to specialists for its construction.
- Product design. The stove, like the other elements of the site, should look harmonious. The uniform style of the house, the surrounding area and all the elements located on it is extremely important. Dissonance, not noticeable initially, can eventually become seriously annoying.
When choosing, it is necessary to focus on the fuel on which the stove will work. Existing models use liquefied gas in cylinders, charcoal or electricity.

This stove, which looks so juicy against the backdrop of greenery and flowers, is actually installed incorrectly: greenery is unlikely to like the heat emanating from it

Such an incredibly beautiful stove will look great in a country style garden, combined with a red tiled roof and other similar elements
Basic principles for choosing a furnace location
Most often, the reference point for choosing a place is considered a kitchen. Its proximity is convenient in that you do not have to spend a lot of time transporting food and utensils to the oven. But there are other points to consider:
- Smoke from the stove can cause conflicts with neighbors, so you need to place a barbecue away from someone else's site.
- Installation of a stationary roasting pan under the crowns of trees is not allowed, because it is harmful to green spaces and from the point of view of fire safety, such a layout is a mess.
- When constructing a stationary structure, the most frequent wind direction must be taken into account. The flame must be covered from its impulses either by the wall or by a protective screen.
The right choice of place will allow you to enjoy the results of your work, without fear that you have to redo everything.

If the oven is installed so that it does not interfere with the neighbors, it will not be a cause for conflict, but an occasion for a friendly feast

In a furnace, the flame of which is reliably protected from gusts of wind, it is pleasant to cook, and such a site before construction is easy to keep clean
Arrangement of a place for rest and barbecue
It’s not easy to build a barbecue oven with your own hands, but all obstacles can be overcome if you do not rush and do everything consistently and competently. Do-it-yourself construction will allow you to build what you want, saving on the labor of hired workers. In addition, the pleasure of the creative process itself is also guaranteed.

Eyes to be afraid, and hands to do - this is the fundamental principle of the work of home masters: nothing is impossible if you try and not rush
Step # 1 - stocking up with the necessary materials
Pre-prepared materials that are always at hand are a great start to a measured work process. To build a do-it-yourself outdoor barbecue oven, we need:
- Concrete mortar. You can, of course, buy a solution, but cheaper, easier and more economical to do it yourself.
- Boards. Unedged board will go to the formwork, and we will use the edged board as the basis for the screed of the countertop.
- Metal waste. The foundation must be reinforced. All sorts of metal pieces that are unsuitable for other work will come in handy for this purpose. For example, it can be old wheels, scraps of channels, a corner or fittings, pieces of sheet metal or wire. If there is no waste, you can take the 10th reinforcement and weld the frame from it.
- Jumper corner (if necessary).
- Brick. Necessarily the presence of a straight three-quarter refractory (heat-resistant) brick with dimensions of 187x124x65mm. The rest of the choice depends on the imagination of the author. The bassoon "Bassoon", front brick and natural stone are perfectly combined. Furnish furnish should correspond to an appearance of the main structure of a site.
- Wooden pegs and twine.
- Slag under the foundation.
- Ruberoid.
- Metal pipe. It is best to use a pipe with a diameter of 15cm.
- Metal sink and faucet.
- Rubber hose.
Unfortunately, the exact amount of material will have to be calculated independently. It all depends on the size of the finished stove.
Step # 2 - design the structure under construction
If you do not want to find out during the construction process that something is missing or a lot of excess has been bought, you will have to make drawings of a barbecue oven. They will help to navigate correctly in space so that the future structure fits nicely into the site plan, and does not surprise with its inappropriateness.

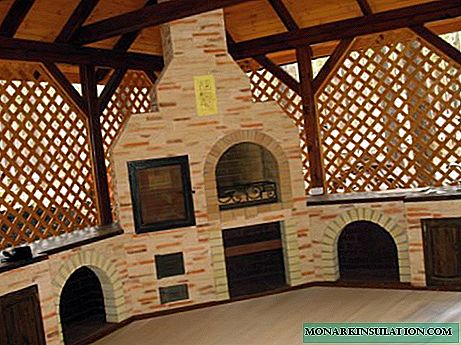
In our barbecue stove, there is also a prudent presence of a sink and a workplace, which is very convenient for someone who is busy cooking
Here are some things to consider:
- Form of construction. The stove should be not only functional, but also pleasant in appearance. If the structure is stationary, then it would be nice to provide a sink and a cutting table. If even now these functions seem superfluous, later you will appreciate them: you won’t have to run between the courtyard and the kitchen.
- Surrounding area. You must immediately remove the branches of large trees, if they are located dangerously close to the pipe structure. The place for the stove must be calculated taking into account the site where you could move away from the burning fire.
- Back wall. The back of the structure looks like an ordinary wall. A tall oven protects the guest area from prying eyes. It must be borne in mind that the back wall will heat up, so you can’t put it close to another building. But the construction of an alpine hill near the back wall is a good idea.
Step # 3 - mount the foundation under the furnace
Since a brick-built barbecue oven is a lightweight construction, a foundation of concrete of grade 100 reinforced with metal waste 20 cm high will be sufficient for it.
- With the help of pegs and twine, we mark the foundation and, along the perimeter of the foundation, we dig a hole 30 cm deep. The stock is 5 cm wide.
- We fill the bottom of the pit with slag and carefully ram it.
- We put the formwork around the perimeter, we place reinforcing metal inside it.
- We make concrete and pour it into the formwork.
Ready concrete should harden in about three days.

The foundation for the stove should not have any differences in height - it is made even, for storage of firewood it will be the floor
Material on how to make a carry for firewood can also be useful: //diz-cafe.com/tech/perenoska-dlya-drov-svoimi-rukami.html
Step # 4 - lay out the first tier
The foundation is dry and you can proceed to the main stage of construction. The screed over the entire surface is covered with roofing material. It should serve as a waterproofing agent. Before you begin laying, you should determine the shape of the openings that will be in the furnace. If they are rectangular, you need corners that will play the role of jumpers. If you plan an arch vault, you will have to make a template from the boards.
We build the walls on cement mortar in half a brick, not forgetting about the openings. The height of the walls with an arched opening should be 80 cm, and with an arched opening - 60 cm. The recommended height was obtained experimentally. If you add 2-3 rows of bricks to it, then the countertop will be 90-100 cm high. A table of this height is comfortable for most people to work with.

To make the arch of the opening, you must use a template that will support the design and not allow it to turn out to be irregular
If you need to make a rectangular opening, put a jumper from the corner on the last row of bricks. We continue the further laying of the wall around the entire perimeter. If an arched opening is used, a support template is installed. It will immediately show how to fold a barbecue oven. It should be noted that in the arch of the arch there must be a central brick, which determines the bearing capacity of the structure. The difference in the thickness of the cement layer between the lower and upper parts of the bricks helps to derive the radius of the arch.

The arch of the arch of the furnace opening must have a central brick, which provides the structural bearing capacity and its reliability
Do not forget about the sink: in the wall you need to lay a pipe in which the water supply and drainage hoses will fit. If you decide to do without a pipe, you can leave a half-brick opening in the wall for these hoses. We make the necessary hole in the lower part of the wall at the sink level. If there is no special pit for draining, then the hose can go to a flower bed or a bed where moisture-loving plants grow.

It is better to use a stainless sink - this is the most reliable, hygienic and aesthetic option, do not forget to prepare holes for the inlet and outlet hoses in the furnace wall
Brick "Bassoon" is narrower than the front. When the final row of the wall was laid out by the Bassoon, a step appeared inside. It is useful to us, therefore, if the brick used by the builder is the same in width, the inner step will have to be made artificially, for this the brick of the upper row needs to be slightly pulled out. The inner step is needed when creating a screed under the countertop.
Step # 5 - screed under the countertop
The screed is the basis for the stove and countertop. It must be done, regardless of what the further surface coating will be. We cut the boards to the size of the span between the inner steps and stack them, leaving an opening for washing.

Between the steps that formed the last row of bricks of the first tier, we place the boards for the screed, do not forget to leave a place for washing, we form the formwork around the perimeter of its location
To do this, leave the place in the opening where the sink will be mounted, leave the boards blank. On the contrary, we make the formwork of the opening for future washing from boards, fixing it with screws or spacers. Now pour concrete at once and leave it to dry for 3-4 days.
Marble slabs can be placed on the dried screed. This durable and beautiful material is often chosen as a natural stone for countertops. The overall design looks very attractive and will last a long time.
Step # 6 - lay out the second tier
The second tier, which will be laid out of brick, includes a firebox and walls. The walls bear an exclusively decorative load and protect the recreation area from indiscreet glances. They put them in a half-brick, and this stage of work does not raise questions.
It is much more difficult to work with the furnace. For laying the firebox of a barbecue oven, made by yourself, use two types of brick. The inner part of the furnace and its bottom are laid out of refractory bricks, and the outer part is made of ordinary. It turns out two rows of bricks. The design of the furnace is time-tested, and it should be done like this:
- The height of the firebox opening is 7 rows of bricks and an arch. If the firebox has a rectangular shape, then its height is 9 rows of bricks. The width of the element is 70cm, and its depth is about 60cm. We lay out 2-3 rows of bricks above the opening, after which we begin to make a pipe.
- The pipe is a narrower element, so all sides of the furnace should be gradually shortened. Each subsequent row for the front and rear walls decreases by a quarter of the length of the brick, and the side walls - by half of its width. Having laid out 6-7 rows in this way, we formed a sufficiently narrow pipe to lay it straight for the next 12-14 rows.
After the masonry settles for a couple of days, you can begin the final stage of work - ignorance of beauty.

Too high a firebox, as well as too long a pipe near the barbecue oven, worsen draft and smoke incorrectly.
Step # 7 - finishing touches in the work
It remains a little: we install a sink and a mixer, bring all the necessary hoses to it, close the tabletop with marble, wood or other suitable material and equip the platform in front of the stove. For the site most often used screening or ordinary paving slabs.

A wonderful barbecue oven, made by yourself in full style in accordance with everything that surrounds it, will delight owners, their friends and neighbors for a long time
Of course, you can also do without outdoor barbecue stoves, as well as without a computer, without a mobile phone and without many other things that are not only useful, but also decorate our lives.