It is enough for the owner of the cottage to go out onto the porch in the rain or snow, as the question of whether or not to have a visor will be unambiguously decided in favor of this design. That's just a convenient time for its construction will be irretrievably lost: you have to wait for spring. During this time, the steps of the porch may one day become covered with ice. Or a snow outgrowth forms on them, and it will be so high that even the front door will be difficult to open. Another option for the development of events is well known to motorists: it rained in the evening, which flooded the castle and froze at night. Do not want to be in this situation? In time, make a visor over the porch!
What should be the visor?
So that you do not have to redo the visor later, you need to have a good idea of what exactly you want to get as a result. The minimum list of requirements that this structure must satisfy is presented below:
- it must withstand not only its own weight, but also the weight of climatic precipitations, taking into account the snow that may fall on it from the roof, as well as the weight of green spaces surrounding it;
- since water will flow on it, it is necessary to provide a system for collecting it into a storage tank or outflow into a storm-water collecting sewer;
- it is desirable that the design protects not only the front door, but also the porch as a whole;
- the construction should not look like an alien spot: it must fully comply with the overall style decision of the cottage.
As for the last point, everything will be okay with external indicators and design, if we focus on the material from which the visor will be created. It should be combined with the exterior of the house, with the porch itself and with the roof. In this case, it is not necessary that the material coincides completely. It is important to choose the right shape, size, color, suitable shade or reasonable contrast.

Sometimes a visor above the entrance is created as part of the main building. Then this is a solid structure provided for by the building plan, equipped with columns that you really want to decorate for Christmas
The shape and size of the visor should depend on the appearance and location of the entrance. Sometimes it is better to replace the visor with a canopy: in this case it turns out to be a more appropriate construction
Choosing the design of the future design
Do not take the time to compile a list of items that your choice is oriented to, since it is your own time that will result in saving this by determining the design of the visor. By writing out your thoughts, you will not lose sight of anything.
Option # 1 - Polycarbonate
Polycarbonate far surpassed all its competitors as the main material for the construction of the visor. In addition to such remarkable qualities as durability, reliability and practicality, polycarbonate is also distinguished by its external attractiveness. Due to the variety of colors used in its production, it is able to match any design ideas. Of course, there are materials that are cheaper than polycarbonate, but working with it is a pleasure.
Before you build your own visor using polycarbonate, you need to study the rules for working with it: nothing supernatural, but it is recommended to observe
Option # 2 - metal
A design completely assembled from metal is a fairly simple and not too expensive option. It’s not as easy to work with metal as it is with polycarbonate, because a special apparatus is needed to weld it. And this means that there must be at least some skills in working with him. However, if desired, welding can be changed for riveting or used to connect the design of the nut with bolts.
The disadvantage of this option is that the metal requires anti-corrosion treatment. Note that this design, unlike the previous one, is completely made of metal, which means that it requires more attention.

Any product will look wonderful if it is touched by the hand of the Master. And in this regard, his choice of one or another material does not really matter
Option # 3 - corrugated board
In terms of popularity, corrugated board can be compared with polycarbonate. Cute polymer coating allows him to compete with this material. But there is a significant disadvantage of corrugated board, which should not be forgotten - when it receives mechanical damage, its surface is irreparably distorted.

Well, and who says that the visor from the corrugated board looks too "simple"? As for mechanical damage, hail in our area is not a frequent occurrence
In order to level this minus, you will have to look for the thickest corrugated board as possible, but you will have to pay more for it. It should be noted that working with it is much easier than, for example, with metal and even metal tiles.
Option # 4 - Lightweight Plastic
This material is very similar to polycarbonate, but in fact it is a special PVC plate. They are used for outdoor work, do not confuse them with cheap plastic that goes to the interior decoration. A feature of this material is its truly unique lightness. At the same time, the material remains durable and completely reliable. Plastic is available in different colors, but can be brought to the desired shade with the help of a film.

Very concise and simple. But by no means "rustic", mind you! Such a visor is similar to a royal speech: laconic and to the point
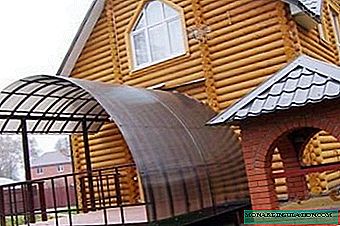
Option # 5 - metal and bituminous tiles
Two very different materials. Visors from them are better to build simultaneously with the erection of the roof of the structure itself. Then the remains of the material will go to the visor, and it will come out almost free. In addition, these materials will only be relevant if the roof and visor cover are completely identical. Otherwise, the difference will be too striking.

A pretty visor made of reddish-brown metal tile looks quite unusual. Its Gothic form is fully consistent with the architectural design of the entire cottage.
These types of tiles are diametrically opposed in weight. The metal tile is a heavy material, and the bitumen tile is light. Nevertheless, both visors will turn out to be pretty and of high quality. The metal product will be somewhat noisier in the event of rain.

This is not even quite a visor, but a whole canopy, covered with flexible tiles. A nice bonus to this cover is silence in the rain. You don’t have to wait for anything like this from metal, metal roofing and corrugated board
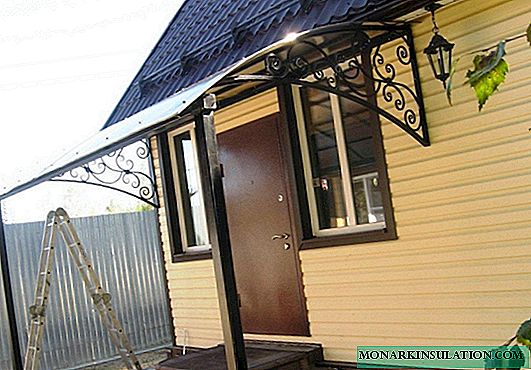
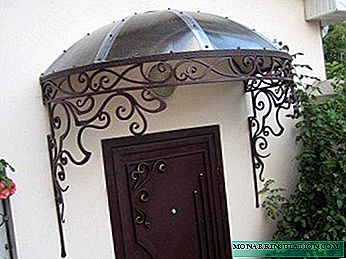
Option # 6 - art forging
From a design point of view, the forged visor has always looked and will look exactly what it is: an expensive and original decoration. Yes, forging is expensive. But how beautiful! If there was not enough money for a completely forged product, opt for the combined version.

Yes ... Well, in principle, a completely forged visor is not needed. It will look heavy, and weigh too much. But this work of art in combination with railings and lanterns looks luxurious
In combination with polycarbonate, tiles, plastic, forging will still be consistently good. The only drawback of this quality design will be its fair weight. This circumstance must certainly be taken into account and entrusted installation of such a visor to trusted professionals so that in winter it does not crash under the additional load of snow.
Option # 7 - classic wood
Recently, among country houses, lurid Gothic has begun to come across less and less, attention is increasingly being paid to high-quality, reliable and environmentally friendly log cabins. The most harmonious with such massive structures looks like a wooden porch and a visor, also completely made of wood.

A flimsy European structure on a mighty Russian log house will look alien, albeit funny. But then everything is in place: a durable construction and flexible tiles as protection against rain and snow
Like the entire log house, the visor must be treated with agents that protect against rot, insects and other troubles that can occur with wood. In addition, waterproofing must be present, which can be used as slate, roofing felt, plastic, sheet metal, polycarbonate, corrugated board and other materials.
Workshops and construction examples
Metal shed visor
Making a visor above the porch with your own hands is not as difficult as it might seem. However, patience, at a minimum, is necessary. To create this reliable and durable construction, we need the following materials:
- metal corners;
- cornice strip;
- adjacency bar;
- bars;
- gutter;
- trumpet;
- flexible tiles or decking;
- screws, screws, anchors.
It is necessary to prepare the tools:
- roulette wheel;
- welding machine;
- hacksaw for metal.
Do-it-yourself work on a visor above the porch with a sketch of a future design. Since we are not going to make a certain abstract visor, but rather a specific one, you will have to take a tape measure and determine the width of your porch. Add 60 cm to the figure determined by the measurement, and you get the width of your visor.

An approximate sketch of the structure looks like this. Do not rely on your own memory and imagination: draw, it will not take you much time, but it will not make a mistake
By measuring the distance from the front door to the place that should be under the protection of the visor, we get the length of the future home-made design. The height of the single-pitch visor is calculated based on the architecture of your cottage. Do not forget that the visor should have a slope of approximately 20 degrees. You have received all the necessary parameters, on the basis of which you can create a sketch.
Next, we proceed to trimming corners of metal to the required dimensions. The length of the rafters from the corners is equal to the height of the ramp. From the corners, struts and a wall beam will be made. Between themselves, all the details of the frame are assembled by welding. The resulting sturdy and reliable frame will be mounted above the porch. The wall beam is fixed with stainless screws in front of the entrance, and anchors must be used to secure the struts.

General view of the structure will be approximately the same. By the way, if you also want to decorate your visor with forging elements, know that they are sold separately, they can be welded
From the bars on the rafters, the crate is laid out. If you will cover the visor with the corrugated board, you need to make a distance of 30 cm between the rails. If the design is done with flexible tiles, the crate must be made solid. The selected roofing material will be laid on it. It is necessary to fix it on self-tapping screws, but with an overlap, but not butt.
The finishing touches are fixing the metal strap adjoining the top of the ramp. A cornice bar is attached to the bottom. It remains to mount the gutter and pipe.
Galvanized steel arch visor
What materials are needed, what tools are needed, and in what sequence to perform work, you can see with your own eyes in this video.
Wooden shed
Another video on how to make a visor above the porch yourself. A detailed video instruction on how to make a wooden canopy over the front door with your own hands.