Do you want to diversify the rest of your children by turning improvised tools into a field for creativity? Then use in the arrangement of the playground and the manufacture of gaming equipment, household equipment that has expired and has not found use in the household natural materials. Be sure that the playground created by your hands will always be filled with laughter and sonorous voices of children playing on it.
Option # 1 - Water Maze
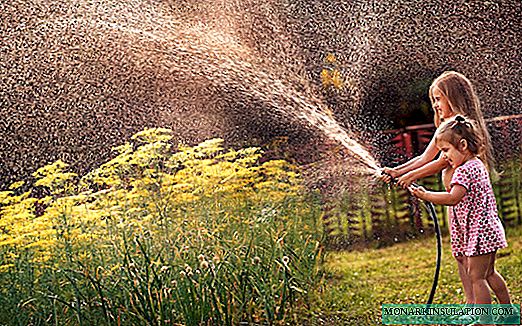
Water games are one of the most favorite activities of children of any age. They are able not only to entertain the curious baby, but also serve as a means of cognition of the world.

You can enjoy communication with the water element by arranging an improvised water maze on the grass in the playing area of the playground
You can assemble a water maze from containers of any size. For this purpose, feel free to use:
- plastic bottles;
- an old teapot with a spout;
- flower pots and pots;
- metal bowls and bowls.
But nevertheless, it is most preferable to use plastic bottles when arranging the maze. They are conveniently cut both along and across, giving the desired shape. Some of the bottles can even be screwed with plastic caps, after drilling small holes in them.
You can learn more about what else can be made from plastic bottles for your garden from the material: //diz-cafe.com/dekor/iz-plastikovyx-butylok-dlya-sada.html
Tanks need only be placed on a vertical plane so that water flows smoothly from one to another, going down to the foot of the structure. To create grooves and tunnels it is convenient to use polypropylene rigid or corrugated easily bendable pipes of different diameters.

As a reliable, but at the same time lightweight support for placing the structure, it is easiest to use a fence, a firmly fixed trellis or one of the walls of the house
There is no strict technology for creating a water labyrinth: containers can be placed on a vertical plane in any order. It is easiest to fix bottles and bowls on the shield with the help of clamps and screws. Elements can be made both stationary and removable. The second option is preferable in that it provides an opportunity for children to change the location of the bowls during the game, each time paving new ways for flowing streams.
Suspended at different heights of the bowl, it remains only to connect the pipe segments, laying them at different angles so that when draining the water created interesting turns and unexpected turns.
To make the process of flowing water more spectacular, pre-paint the liquid with watercolor or gouache paints in the desired shade.

Such a labyrinth created from improvised means will certainly cause a sea of delight among children, giving a great opportunity to have fun in an interesting occupation
Games with water will contribute to the development of coordination of movements of the child in the eye-hand system and tactile-kinesthetic sensitivity, while simultaneously relieving tension and exerting a psychotherapeutic effect.
Option # 2 - Natural Constructor
Small stumps, round saws and branches left after pruning the orchard can also be used on the playground. They will serve as an excellent basis for creating a natural building constructor.

It will be pleasant for the child to pick up neatly cleaned whetstones in his hands, using for the construction of multi-tiered towers and high castles
From stumps, young designers will be happy to build forest houses for dolls and reliable fortresses for soldiers protecting them, and from round-sawed children, they will lay out pyramids and multi-level structures.

Thinner twigs and fir cones can be adapted to material for laying out puzzles on the grass or for creating geometric patterns
To protect babies from scratches and splinter when playing with natural material, each blank must be carefully cleaned with sandpaper from chipping and sharp edges.
Material about crafts for the playground will also be useful: //diz-cafe.com/dekor/podelki-dlya-detskoj-ploshhadki.html
Option # 3 - a twister on the grass
Young fidgets will appreciate the offer to play an active game of twister. The main task of the game is to maintain balance by resting your feet and palms in circles drawn on the playing field at a certain distance from each other. The rules of the game are so simple that children can master them in just a few minutes.

It is difficult to resist laughing, trying to fulfill the leader’s task and reach out to the desired circle with his foot or palm, without burying his face in the grass
The beauty of the game is twister, in that it is interesting not only to play it. Observing from the side how the participants are trying to twist around to take the pose indicated by the arrow is very exciting and funny.
In order not to bother every time with laying out a large canvas, the playing field for the twister can be built directly on the grass. To work, you will need:
- lace and pegs for marking the site;
- round cardboard stencil;
- a set of strips of thick cardboard;
- 2 cans of small diameter;
- spray paint in 4 colors.
The circles of the playing field in a traditional twister set are painted in four colors: yellow, red, green and blue. For lack of such shades, you can use any other color you like. The main thing is that it looks contrasted against the background of green grass.
When choosing a paint for applying circles, give preference to compositions on a latex, vinyl-acrylic or aqueous emulsion base. They have bright saturated shades and do not pose a danger to the health of children.
To equip the playing field, select a flat area measuring 4x2.5 meters. With the help of pegs and lace, mark the boundaries of the future field and outline 4 lines for the placement of rows of colored circles. Then, dividing each line into 6 equal sections, outline the points for the placement of colored circles. You should get a field consisting of 4 rows, each of which fits 6 circles of the same color.

To get colored circles with smooth edges, and the playing field had a neat appearance, use a stencil when painting "islands"
Spray paint through a stencil, forming row after row of playing fields. While the paint dries, they begin to manufacture roulette. It will indicate which position a player needs to take. You can make it from the same cardboard. But you can do much easier. This will require 2 banks. Strips will be enclosed in them:
- in the first bank - strips of the corresponding four colors;
- in the second - white stripes with the image of the right and left foot and, accordingly, the right and left palm.
During the game, the leader will simply take out one lane from the cans and form, in turn, a “pair” task for each of the players.

An exciting game in the fresh air will become a vivid attribute of the recreation area and will easily turn a regular day off into a fun holiday
Option # 4 - music wall with xylophone
Noisy instruments contribute to the development of musical and creative abilities of kids, not to mention the joy that the children’s home orchestra organized by their children brings. By combining all kinds of “noise”, “rattles”, “zinkels” in a single design, you can build a musical wall.

Do-it-yourself noise tools made from improvised tools will make your child hear the wonderful world of sounds in a new way
To create a music wall you will need:
- empty tin cans;
- metal covers;
- plastic bottles;
- old cutlery.
In principle, you can use any kitchen utensils from which you can extract sounds. Plastic bottles can be easily adapted for rattles, filling them with old buttons or seeds of persimmon and apricots, and then hanging them on a strong thread to the shield.
Several metal corners and old disks suspended on an old hanger each time they come in contact with each other will make a sound similar to bells.

To turn nutshells into “rattles”, and plastic bottle caps into “rattles” will require a minimum of strength and skills
Varying the ways of playing, the kid will explore the sounds, creating musical images close to him and taking the first steps in making music.
To create more muffled, but not inferior in melody sounds, you can even build a xylophone. The instrument looks like a small shield, including up to twenty wooden plates connected to each other in a sequential scale.

A xylophone is assembled from 10-15 wooden blocks. The longest plate can reach 50-60 cm, and each subsequent one should be 3-4 cm shorter than the previous one
To protect young musicians from splinters and scratches, each bar is cleaned with sandpaper. Each “note” marks the middle with a marker. Having departed from the center by 4-5 cm in each direction, outline points under the holes for fixing the rope. A rope is attached along the intended contour, fixing it with nails or paper clips so that the distance between the bars is at least 1.5 cm.
When hanging the xylophone, pay attention to the angle of inclination: it largely determines the sound of the instrument.

Playing with sounds is the right way to the beginning of improvisation, thanks to which the child will successfully form figurative-associative thinking
Such games in the fresh air will help develop the imagery of music perception, opening up a wide scope for kids to manifest their "I".
Option # 5 - stone cave "elves"
Without exception, children like to spend time building different shelters. They can dig for hours in the garden, erecting fairy tales from branches, blankets and curtains, and then equipping their own housing.
However, such buildings have one unfortunate drawback: with careless movement during active games, they can literally collapse before our eyes. Take the initiative into your own hands and offer to build a stronger house for young fidgets.

By building a fabulous house of "elves", you will provide children with their own space and give young dreamers the opportunity to develop their imagination
A fairytale house that looks like a stone cave is easy and fun to do. It is better to choose a place for its arrangement on an open and well viewed site from all sides. Its surface is leveled, cleaned of stones and plant roots.
To make an elven house you will need:
- a piece of tarpaulin or a dense plastic film measuring 2.5x2.5 m;
- reinforcing wire mesh;
- wire ties;
- plastic pipe d20 mm;
- M300 concrete, sifted sand and water.
For work, you can use both a metal reinforcing mesh, and made of polypropylene.
From the materials you need to prepare:
- scissors for metal work;
- a container for mixing the solution;
- plastering trowel;
- atomizer;
- insulating tape;
- protective clothing, gloves and glasses.
The prepared base is lined with a tarpaulin layer. This will facilitate the subsequent process of cleaning construction residues and pieces of falling solidified cement mixture.
It will also be useful material on how to create original figures for a cement garden: //diz-cafe.com/dekor/figury-iz-cementa.html
The first step is to build a circle of the base of the frame. To do this, cut a piece of pipe 5 meters long and connect its ends to each other.

It is easiest to form a circle by closing the ends of the pipe end-to-end using a connecting pipe of a smaller diameter, fasten the joined edges by wrapping the electrical tape
Vertical arches of the frame are constructed using the same PVC pipe d20 mm. To do this, take 4 equal segments 3.5 m long. Arches are formed from the segments, setting them at right angles to each other. The edges of each segment are fixed to the base, uniformly filling the gaps around the entire circumference.
Two horizontal crossbars are fixed on the vertical arches: the lower is 4.7 meters long, the upper is 3.4 meters. Crossbars are placed on the outside of the frame, fixing them to the arches with electrical tape.
To form the walls of the cave, the finished frame is wrapped with a reinforcing mesh. Ensure reliable fastening will help wire ties, which must be performed on the entire plane every 250 mm. To create a more reliable design, the mesh is applied in 2-3 layers.
Having outlined a place for the arrangement of the doorway, with the help of wire scissors cut off the excess part of the mesh and bend the edges. By the same principle, a small window is made opposite the doorway.

The walls of the house are “built” from cement mortar diluted in a separate container, laying it on a wire mesh and evenly distributing it on a vertical surface
Apply the cement mixture only in protective latex gloves, the dense structure of which protects the delicate skin from "erosion".
When laying the finished mixture on the grid, do not press hard, otherwise, when pressed, it will fall through the cells. To create strong walls, the solution is laid out in several layers, withstanding before applying each subsequent time period of 5-8 hours. You should not rush at this stage. The time-consuming process can take several days. If the plaster dries too quickly, before applying each subsequent coat, wet the surface with water from a spray bottle or ordinary hose.
If the wire base begins to sag under the weight of the stucco mixture, lean the walls with wooden blocks until the solution solidifies.
Spreading each layer of plaster, and having waited until it gains the necessary strength, it is necessary to correct surface irregularities with the help of a plaster trowel.

After applying the last layer, it remains only to slightly level the walls of the cave, carefully cleaning out the defects, trying to maintain its "natural" appearance
To protect the building from atmospheric precipitation and give it a more presentable appearance, cover the outer and inner walls with oil or water-based paint. Yes, to create such a cave you have to make a lot of effort. But the result will fully justify: there will be no limit to children's happiness. Little dreamers and young fans of elves will be happy to spend time in their new fabulous "house".
If you wish, you can even build several caves nearby, creating a small town for role-playing children with transformation into fairy-tale characters.