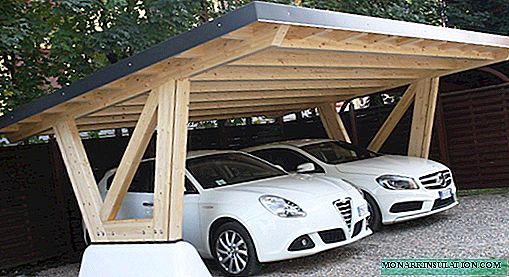
When planning the arrangement of the territory of a suburban area, each owner-motorist must provide a place for one or even two cars. But even having a garage on the site, there is not always time and desire to drive a car every time you enter the yard. A do-it-yourself carport is a great addition to a stationary building. The main advantage of arranging such a carport is the ability to leave the car in the open air, the free movement of which contributes to the rapid evaporation of moisture, thereby inhibiting the corrosion process of metal elements of the car.
Canopies of what designs exist?
Choosing building material for arranging a canopy, many owners of suburban areas opt for wood. Canopies made of wood, in comparison with metal structures, have a number of indisputable advantages, the main ones of which are:
- Environmental friendliness of the material;
- Lightness of the constructed structure;
- Easy installation and processing (polishing, painting or varnishing);
- Low cost.
Awnings for cars come in two varieties: stationary structures and extensions to the building.
In order for the addition of a wooden carport for the car to create, together with other buildings on the site, a single harmonious architectural ensemble, the same finishing building materials should be used for its construction. To increase the stability of the structure, the columns are additionally concreted, or they are installed on a previously prepared concrete site.

Attached canopies act as a kind of continuation of an existing structure. One end of the canopy rests on the wall of the house, and the other on the racks

Awnings for cars made of wood can also be stand-alone stationary buildings. At least four support posts are used to equip such structures
When planning to build a canopy, designed to accommodate two or three cars at once, the number of racks can increase to eight or more. On average, during the construction of a canopy in several parking spaces, poles are installed around the perimeter of the site at a distance of one and a half meters from each other.
It will also be useful material on how to arrange parking for cars in the country: //diz-cafe.com/postroiki/stoyanka-dlya-mashiny-na-dache.html
Choose the optimal dimensions of the building
When deciding to make a carport on a site, you should first determine the size of the future building.

The dimensions of the building structure depend on the number and dimensions of vehicles that will be stored under its roof. But in any case, the length and width of the canopy should be one or two meters larger than the dimensions of the car
To accommodate a car 4 meters long, you need a canopy measuring 5x2.5 m. To store larger cars, such as a minivan or jeep, you need a canopy measuring 6.5x3.5 m.
As for the height of the structure, it should be calculated taking into account the height of the machine itself and the possible load on the upper trunk. At the same time, a too high design is far from the best option, since there is a chance of the roof loosening under strong gusts of wind, as well as slanting.

The optimum ratio of the size of the canopy to accommodate one machine. On average, the height of the canopy does not exceed 2.5 meters
When planning to erect a structure with a height exceeding three meters, it is necessary to provide for the arrangement of powerful transverse beams that will cover the entire canopy around the perimeter, thereby increasing the strength of the wooden structure. The roof, however, should be gable, since such an arrangement option is considered more reliable.
Stages of building a wooden canopy
Stage # 1 - foundation tab
When choosing a place to place a canopy, you should give preference to the "strategic" points of the site: the areas in front of the gate, near the garage, along the garden or vegetable garden. This will make it possible to use the canopy not only to place the car, but, if necessary, to store garden equipment, firewood and harvested crops.

Place under the site should be at a small elevation, which will prevent the accumulation of wastewater during rainfall
Tip. It is better to choose a place under the site on a small elevation, which will prevent the accumulation of wastewater during rainfall.
For the same purpose, drainage ditches are dug around the perimeter of the site, which, after completion of construction work, are covered with gratings.
The construction of a canopy of wood with your own hands, as well as the erection of any building, begins with laying the foundation. To equip such a relatively lightweight design, you can use a columnar or pile-screw foundation. The option of installing ready-made foundation blocks or deepening the pillars themselves is possible. To lay such a foundation, the number of supports should be calculated, and a pit with a depth of at least one meter should be dug under each of them.
Having installed the supports, to give structural strength to the lower part of the posts we nail transverse cutting boards and concreted.
Tip. To extend the life of wooden supports, you should pre-treat them with an antiseptic composition, the components of which will prevent wood from decaying.

Supporting vertical posts to the base of the structure can also be attached using brackets and angles
The site itself under a canopy can be concreted or laid out with paving tiles.
Stage # 2 - the construction of the frame
We install vertical racks. To create a uniform slope of the supports along the entire length, longitudinal beams are mounted, the position of which is carefully checked already on the first two racks. After that, opposite longitudinal beams are installed, determining the necessary level of inclination using the level and the rail. The angle of inclination of the longitudinal beams laid in the grooves of the upper ends of the supports should not exceed 3%.

Fastening of longitudinal beams to supports is carried out using steel angles fixed on screws
Arrangement of both a gable and a gable roof is impossible without laying the rafter system. The rafters are laid on the installed supports, fixing them on the longitudinal beams, maintaining a distance between them of 70 cm. The extreme rafters are laid on the beam, stepping 8-10 cm from the edge, to leave room for the arrangement of the gutter. Joining wooden frame elements is best done by cutting at the ends of the shelves - "half-tree".
Stage # 3 - installation of the roof structure
On a sheathed frame we lay the roofing. Among the most popular roofing materials can be identified: polycarbonate, wood, decking.
The main advantages of cellular polycarbonate are: low cost, ease of installation and excellent performance. When deciding to line the roof with polycarbonate sheets, it is enough to measure the dimensions of the frame and use the power tool or hacksaw to give the necessary shape and size to the sheets.
Tip. When working with cellular polycarbonate, it is important to monitor the perpendicularity of the arrangement of the sheet channels relative to the surface of the earth. Due to this arrangement, penetrating moisture will freely evaporate.

Polycarbonate sheets are fixed on the frame using self-tapping screws, the diameter of the holes for which should be slightly wider than the size of the self-tapping screws
Under the influence of temperature differences, the material expands and contracts. A small reserve of the diameter of the holes will prevent cracking of the edges of the attachment points.
To prevent moisture and dust from entering the cavity of the covering material, the upper and lower edges are closed with a solid or perforated tape, and rubber pads are used at the attachment points.
When planning to roof from wooden boards, they should be treated with a waterproof mixture. This will allow for several years to extend the life of the roof structure.
You can learn more about how to make a polycarbonate canopy from the material: //diz-cafe.com/postroiki/naves-iz-polikarbonata-svoimi-rukami.html

When choosing corrugated board as a roofing material, it should be borne in mind that the sheets are laid with a small overlap, and their fixation is performed first in the corners and only after that over the entire surface of the product
Fix the sheets on the frame using galvanized self-tapping screws, laid on rubber washers-gaskets. For more information about installing a roof on a canopy, see the website “Roofing Guide“.
Video example of construction work
You can decorate the carport that protects the car from bad weather by arranging a pergola with climbing plants on one side of the frame: wild grapes, clematis, and a rose.