When ennobling the area around the house, many owners often ask themselves how to cover the paths, the front and back courtyards, the relaxation area ... The paving slab is excellent for these purposes. Functional coverage in landscaping is unparalleled. The price of the material is far from fabulous, and the laying of paving slabs with your own hands is quite simple in execution. So the design of paths and playgrounds on the site will not cost too much, and at the same time it will be a decent frame for the garden and decoration of the adjoining territory.
What is good paving slab track?
This building material, popular around the world, has a number of advantages.
A variety of colors, shapes and textures
This allows you to create a harmonious ensemble, combining all the elements of the site into a complete picture, and embody any design and architectural ideas.

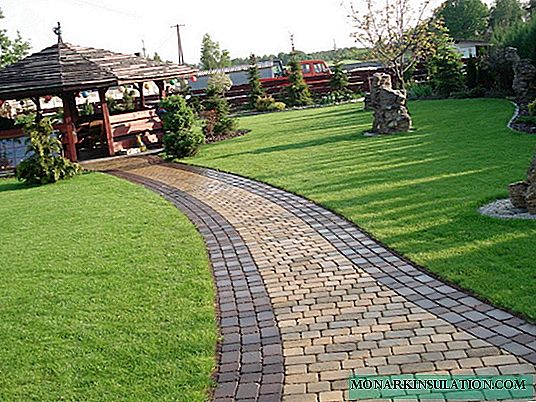
Thanks to aesthetic appeal and excellent operational characteristics, paving slabs are irreplaceable in landscape design
Environmental friendliness and comfort
Paving slabs do not emit harmful volatile substances when heated and do not soften under scorching sunlight. Sand-filled inter-tile seams allow excess moisture to seep out after rain, preventing the formation of puddles.

The path paved with tiles does not violate the natural need of plants on the site for water and gas exchange
Easy maintenance and durability
Paving slabs are an ideal covering in the conditions of frosty winters; it has high strength and low abrasion.

With high-quality laying, tiles can last more than 15 years
Both the technology of laying paving slabs and the subsequent care for it are quite simple. In case of damage to the coating, there is always the opportunity to restore the site by selecting and replacing just a few tiles.
In order for the paved paths and platforms on the site to become not only an original addition to landscape design, but also to serve regularly for many years, it is important to take into account a number of key points when conducting work on how to properly lay paving slabs. For example, depending on the location and purpose of the coating, the laying of paving slabs can be performed both on mortar and on sand or gravel.

For the arrangement of garden paths and recreational areas, it is enough to use a sand and gravel "pillow"
Step by step tile laying
Choosing the tile and the necessary tools
At the stage of preparation for laying paving slabs, it is extremely important to correctly select products and necessary tools from a wide range of products that will be simple and convenient to work with. When choosing a tile, it is necessary to focus not only on taste preferences, but also take into account the operational characteristics of the material. So, equipping a recreation area or an indoor carport, you should ask the manufacturer: is the tile able to withstand heavy structures or is designed only for human weight.

Attention is paid to surface roughness, product shape: are there any rebounds, will it need to be trimmed
To carry out the work you will need tools:
- Master OK;
- wooden or rubber mallet;
- manual tamper;
- metal or wooden pegs;
- cord-ordering;
- building level;
- I-beam or any pipe diameter;
- watering can or watering hose with a spray;
- rake and broom;
- M500 cement and sand.
To determine the number of tiles and raw materials for the base, it is necessary to think over the layout of the site, taking into account the location and size of its paths and platforms.
One of the basic rules for laying paving slabs is the need to equip paths with a slight slope for each meter of 5 mm so that water freely leaves them in wells or on lawns.
Arrangement of the base
The success of the entire construction directly depends on the reliability of the base surface. When arranging the base along the edges of the location of the future track, stakes with notches are clogged at a height of 5-7 cm, at the level of which the cord is stretched. The turf layer, stones and debris are removed from the construction site.

In order to lay any paving tiles with your own hands, you must first carefully prepare the base
To level the surface of the outlined area in elevated places, an excess layer of soil is removed, and on the depressions, pits and hollows, on the contrary, it is sprinkled. The rake-lined base is carefully rammed. When working with soft soil, it is advisable to moisten the leveled soil surface with water before tamping. Thoroughly tamping the base will prevent uneven subsidence of the sidewalk.
The depth of the base is calculated with a margin of a couple of centimeters, taking into account the fact that shrinkage always occurs during compaction. On average, laying a layer of sand and the tile itself takes from 20 to 30 cm.

After excavation, the front side of the tile should reach the desired level.
The entire surface of the future track is given a transverse, longitudinal or longitudinal-transverse slope. At this stage of arrangement of sites and paths, work is also underway on laying communications. Laying geotextiles before filling sand will prevent the growth of weeds between the tiles.
Creating a "pillow" of sand or gravel
Sand can be laid on the prepared base layer of the soil, which will not only increase the stability of the sidewalk, but will also act as a drainage system. The sand should be leveled with a rake and poured with water until puddles form on its surface. After 3-4 hours in sunny weather, the “pillow” can be given a smooth, even shape with the help of a profile, which can also be a regular pipe or beam.

To smooth the surface of the sand layer, you can use inch PVC pipes
Pipes are placed by rail type at a distance of 2-3 meters from each other. The gaps between them are filled with sand to the same height, providing a flat surface along the entire length of the site.
To impart greater strength to the coating, paving slabs can also be laid both on the crushed stone base and on the mortar. For this, it is necessary to prepare a dry sand-cement mixture in a ratio of 3: 1. The mixture is laid out in an even layer on the base, the channel is screed. When working with "complex" soils, it is advisable to use a combined laying consisting of a layer of cement-sand mixture and concrete.
Installation of pavers
Before laying pavers, it is necessary to pull the cord-order along the chamfer. It is better to start laying paving slabs with your own hands from the curb. The first row is laid out strictly on the cord. Tiles are laid out in the direction "from oneself".

Place the "bricks" in such a way that they fit snugly together
This will avoid increasing the width of the seams. The use of crosses will make it possible to set equal intervals of 1-2 mm between the tiles. If the tile does not lie smoothly, you can use a trowel to remove or place a layer of sand under it and then compact it again.
It is necessary to level paving slabs using a building level and a mallet. Upon completion of the laying of the tiles, the seams are covered with a layer of cement-sand mixture and watered with water.

To give the track a more accurate and attractive appearance, tile joints can be “wiped” with quartz sand
If the tiles are poorly docked with other buildings or landscape design elements, you can trim its edges with a grinder.
Upon completion of work, garbage and sand remains are swept away from the finished track. The installation of a border on the M100 liquid solution will prevent loosening of the tiles and the “creep” of the track.
Video master classes with styling examples
In the future, it is enough only to update the sand washed out by water in the seams of the paving stones. The path decorated with paving slabs will be an excellent decoration of the site.