Creating ponds, fountains and waterfalls in your own garden is a fashionable trend in landscape design. With a small pond, any garden will be transformed, this is one of the best places to relax on a hot day, when the water is fresh and cool. The pond will be much more picturesque if a stream of water from a man-made waterfall falls into it. Do-it-yourself waterfall in the country can be done on your own, for this some construction skills, proper calculations and the presence of creative imagination are needed. If you already have a pond on the site, making the waterfall easier. If there is no reservoir, you need to find a place for it - the presence of a waterfall always implies the presence of at least the smallest pond where the water will flow.
Stage 1 - choosing the shape and depth of the structure
The shape of the pond into which water will fall from a man-made waterfall can be any. If you like crisp geometric shapes in garden architecture, you can make the pond round or rectangular. If you prefer natural forms, the contours of the bowl can have any shape, but not too complicated to conveniently carry out construction work.
The pond can be shallow if you do not plan to get fish and underwater plants in it. If you want the pond to delight you with underwater flora and fauna, its depth should be at least a meter, and better and deeper, so that fish and plants can overwinter without freezing.
Stage 2 - digging a pit
You have decided on the size and shape of the bowl, now you need to drive the pegs along the intended contour and pull the rope. The earth formed during the work should be cleaned of stones, roots and other debris. Fold the earth in a separate place, it will come in handy when arranging a waterfall and a pond. Earth from the walls of the bowl will crumble, this is inevitable. Therefore, you need to periodically moisten and tamp them. When the pit is ready, add a layer of sand (10-12 cm) to the bottom, and carefully compact it.

The foundation pit for the pond is oval in shape, the walls and bottom are carefully tamped. Depth a little more than a meter will allow it to breed fish and aquatic flora in it.
Stage 3 - pond waterproofing
This is an important stage of work, how well-made waterproofing depends on how long a decorative waterfall for a garden will last.
For waterproofing, it is better to use a PVC film - it is durable and durable. And if you choose butyl rubber, a pond with a waterfall can last several decades. We line the pit with a layer of waterproofing so that a significant part of the material (at least 1.5 meters) is located above the pit so that the film can be well fixed.
If you choose film waterproofing, you will need to lower the water for the winter - when freezing, the volume of liquid will increase and damage the waterproofing layer.
You can learn more about the device of the pond using a film from the material: //diz-cafe.com/diy/prud-na-uchastke.html

A layer of film waterproofing protrudes over the surface for a long distance, this will guarantee its reliable fixation so that the film does not slide into the pond, it is fixed with stones

Directly on the waterproofing layer, the shores of the pond are finished with stone fastened with concrete mortar. It turns out pretty nice, and the method of such decoration is simple and practical.
The most practical option is concrete pond waterproofing. Initially, the bottom of the pit is lined with durable plastic film, a wire frame is laid on top of the film, covering the walls and the bottom of the future pond. First you need to fill the bottom with concrete, reinforcing the bottom of the frame in the concrete layer. When the bottom hardens in about a day, the walls are poured.

To create a pond, you can use a ready-made plastic bowl. It is convenient to fix it, you will not need a waterproofing layer here, and it will be convenient and easy to clean such a pond
Stage 4 - creating a waterfall
Two options are possible here:
- Waterfall in the garden using the finished form. You can buy it at a specialty store. It can be a beautiful vessel or a sculptural composition.
- Large cascading waterfall. If you decide to make this design, then you will need a natural stone. Sandstone is the most convenient material for this purpose, but small boulders can also be used. In order for the water flow to flow smoothly and smoothly, you need to use flat stones for the cascade.
If you want to get a strong stream breaking down below the stones, in the upper tier, skip the stream between the stones that are snug against each other, and place the lower tier at a decent distance so that the water stream can break and foam. Thanks to stones with an uneven surface, a waterfall can be turned into several separate jets.
The selected stones are stacked accordingly, the masonry is fastened with cement mortar.

To create this waterfall, a small special jug was used. You can choose a vessel of any size, it can be a sculpture, and any other composition you like that you can buy in a store

When designing a waterfall and creating a cascade, sandstone was used. This is a simple design where flat stones are laid out in several layers and water flows into the waterfall in a single stream without obstacles
Stage 5 - pump selection and installation
If the height of the waterfall is not more than one and a half meters (this option is most preferable, because it is easy to look after such a waterfall), a pump with a capacity of 70 W will be enough for you. With a higher cascade, a more powerful pump will be required. Try to choose a pump with a flow control function, then the power of the jet can be adjusted as desired.

This diagram shows the location of the pump that supplies water to the cascade.
The pump will supply water to the top of the waterfall with a hose. It is better to hide the pump structure under the stones so that all its parts, cables and hoses do not catch your eye. The hose connecting to the water-pushing hole in the pump structure extends to the top of the cascade, the second hose, which draws water, remains at the bottom of the pond.
You can learn more about how to choose a pump for the fountain and waterfall from the waterfall: //diz-cafe.com/voda/nasos-dlya-fontana-i-vodopada.html
Stage 6 - decorating the structure
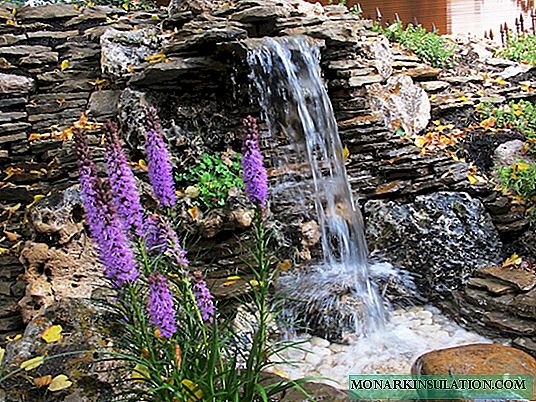
The most enjoyable stage of work is decorating a waterfall. Artificial waterfalls in the country - this is the main decoration of your garden, the best place in the summer heat, so the shores of a small reservoir should be attractive and picturesque. Stones, plants and garden decor are used to decorate the shores. Here you will come in handy and the land, which was formed in the process of digging a pit.
Framing the coasts can be made of sandstone or rounded boulders, alternate stones, make sandstone masonry on both sides of the cascade, such as sides, so that it restrains spray. A good material for the decor of the shores of the pond is pebbles.

Crushed stone, boulders, pebbles and alpine mountain plants were used to decorate this pond with a waterfall. Such a cozy corner with a gravel garden and a pond may appear in your garden. Pebbles and gravel will not let plants grow much, the area around the reservoir will always look neat
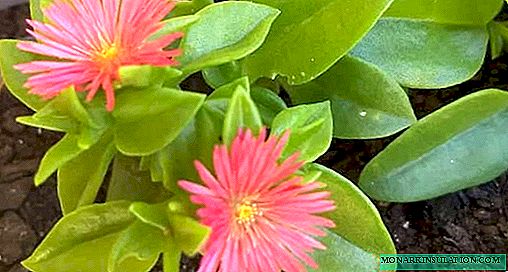
The pond will be especially beautiful if you use several aquatic plants. In the artificial pond, yellow egg capsules, water lilies (nymphaea), and a teloresis pistol take root well. Flowering plants in the water will turn your pond with a waterfall into a fabulously beautiful corner, and they also purify the water.
Off the coast of the pond it will always be wet, so any flowers will grow well here. If your pond with a waterfall is clearly visible only on one side of the garden, plants need to be planted on the opposite side. If it is well visible from everywhere, you can leave most of the banks open, and plant plants in groups.
Also useful will be material on the selection of plants for the pond: //diz-cafe.com/voda/rasteniya-dlya-pruda-na-dache.html

A pond with shores covered with gravel will look good, against which background plants will stand out with their greenery and flowers
At the pond with a waterfall you can equip a corner for relaxation - put a garden bench, above which you can place a pergola. Roses will grow well near the water, a bush of which can also be used to decorate pergolas. Usually a water corner is a favorite place for all family members. For children here you can arrange garden sculptures in the form of gnomes, funny little animals.
The illumination of the luminous stones can be placed near the coast, at the bottom, to illuminate the cascade, and lanterns in the form of wonderful shining flowers are allowed to float on the surface.

Just a few colored glowing stones located under water - and your pond with a waterfall at night will become a mysterious beautiful corner
It’s nice to create garden waterfalls with your own hands, and it’s doubly pleasant to relax near a pond in the summer heat or in the evening, in the shade and coolness. You should think about the evening design of your pond with a waterfall. In the evening and at night, floating lanterns or luminous stones will make your pond fantastic.