Paying tribute to traditions or simply decorating a house adjoining land, suburban real estate owners decorate wells with wooden houses of various shapes: from a simple extension roof with a door to a very solid log house resembling an arbor. Dozens of companies offer luxurious products with carved elements in the form of animals and openwork ornaments, but it is much more pleasant to build an original house for a well near the cottage with your own hands. Walls from a bar or a wide roof have a practical orientation: they protect the water in the well shaft from the ingress of debris that is carried by the wind. From the point of view of safety, the house is also important: it serves as a barrier to children and animals.
Consider several projects of buildings made of wood - natural, beautiful material, which is very easy and pleasant to work with.
Preparation: material and tool selection
Whatever the project, the tool is always the same - the one that is needed for wood processing. So, before starting work, you should prepare:
- circular saw, electric planer (ideally, a woodworking machine, on which all details can be quickly and easily prepared);
- hacksaw and jigsaw;
- hammer;
- Phillips screwdriver
- nail clipper;
- level, pencil, tape measure (at least 3 m).

For the construction of a well house, any tool for working on wood is suitable
Having previously made the drawings of the house for the well and made simple calculations, you can prepare the material for construction in advance.
To erect a wooden structure you will need:
- timber (rounded, glued);
- edged board;
- fasteners (screws, nails);
- roof covering material (roofing material, flexible tiles, slate);
- hinges, handle and latch (if there is a door).
All wooden parts should be sized, sanded, and treated with protective compounds. Antiseptic and varnished wood looks better and lasts longer.
Project No. 1 - a house with a gable roof
So, we are building a roof house for a well or a well, from which water is supplied to the house using a pump station. This is a small room to protect the head of the well rings, and a door is needed to control the operation of the pump, as well as to clean and disinfect.
You can find out how to properly supply water to a private house from a well or well from the material: //diz-cafe.com/voda/kak-podvesti-vodu-v-chastnyj-dom.html

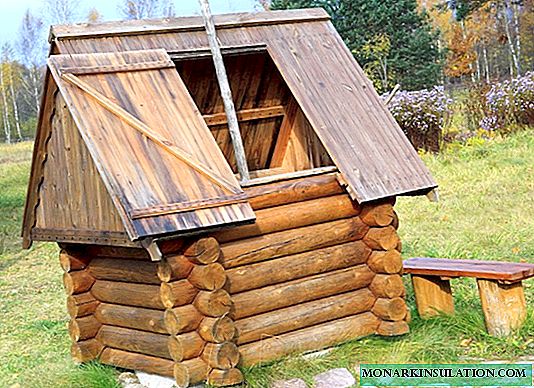
Large well house with a door, built in the form of a large roof
Frame construction
The main material for the frame device is a bar and an edged board. Too voluminous details will make the structure bulky, too thin to be brittle, so it’s worthwhile to dwell on the average parameters: beam section - 80 mm x 100 mm, board thickness - 40 mm. It is necessary to prepare four racks with a width of 8 cm and four edging boards suitable for the lower and upper trim, with a width of 12 cm. The boards are sawed in advance in size, then the details of the strands are successively pinned to the racks, so that a smooth and reliable frame is obtained. Attention should be paid to the fasteners: the length of the nails should be such that they firmly connect the two parts - approximately 10 cm.

On the frame diagram, the fastenings of the upper and lower trim to the racks are clearly visible
The frame is easiest to assemble in the following sequence: first connect the two racks with the boards above and below, then fasten the remaining two racks in the same way, place both structures around the well shaft and finally connect them together with strapping.
According to this project, you can build everything quickly and from improvised materials, since almost any of them - boards, boards - remain in the country during the construction of a house or bath.
Roof device and cladding
Roof construction should begin with the installation of roof trusses - a rigid structure on which the crate will be mounted. It is better to choose sufficiently strong boards (at least 3 cm thick), the length of which is 180 cm - the height of the structure will depend on the length of these boards. For mounting the crossbar and jib, a board of smaller thickness - 2.5 cm will be required. The jib must be 8 pieces, rafter parts - 6 pieces, crossbars - 3 pieces, each length - 30 cm.

The distance between the elements of the crate should be the same
Work sequence:
- Having cut the rafters at an angle, their upper ends are interconnected. As fasteners, self-tapping screws are used. In addition, the bolt attached 30 cm below the top point will help fix the location of the rafters. It is better to carry out all actions by putting the parts on the ground.
- On the rafters, a cut is made in the place where they will be connected to the boards of the upper trim. Connect the frame and rafters using nails (12 cm long).

Connection diagram of rafters with the upper frame strapping
- Installation of rafters is strengthened by installing jibs. Rafter trusses are connected using a kind of ridge - two boards, to which the crate is subsequently attached. The interval between the elements of the lathing is 13-15 cm. The protrusions above both walls of the building are 10 cm.
- The constructed roof is covered with roofing material.
- Slate is mounted on roofing material with special fasteners. Places of corner joints are covered with wind boards.
3 more options for constructing a cover for a well can be found in the material: //diz-cafe.com/voda/kryshka-dlya-kolodca-svoimi-rukami.html
Door mounting
The door to the house is a kind of wooden board, which is made in a simple way. Boards are cut with a length of 85 cm and a width of 15-20 cm, folded one to one and fastened together with wooden blocks with a cross section of 2.5 cm x 3 cm. Two bars are enough - one from the bottom, the other from the top. Self-tapping screws are used as fasteners, 4 pieces for each board. To keep the door in shape while moving, and the boards do not "walk", another block is pinned diagonally - for rigidity.

The base and frame of the house are practically hidden under the roof, and the door is above the base, above ground level
After sheathing the gables, a handle and a latch are pounded in, then the door is hung on the piano loops. Finishing stage - processing the boards from the outside with protective agents against mold and fungus, painting with varnish or special paint for wood to match the neighboring buildings.
Project No. 2 - log cabin
The next creation is a house for a well made of timber, made in a classic rustic style. This design of the well can be seen in Russian villages. The rounded logs are folded in the form of a small log house - the size of a well, a wide roof is erected on top of two massive racks and a gate is installed to raise a bucket of water. The edges of the roof go beyond the frame so that rainwater does not fall into the well. For stability, the racks are equipped with small supports, which play a decorative role.

This building has three main parts: the base-frame, gate and a wide roof
The protruding ends of the logs have curly cuts, which also serves as a decoration of the structure. The roof is covered with bright waterproofing material.
For the construction you need:
- logs for logs, racks and gates (sizes are selected according to the diameter of the well);
- edged board for props and roof;
- roofing (slate, tile, roofing material);
- material for the gate with a handle.

The scheme of the gate for the well with dimensions (they can be changed, but at your own peril and risk)
Project No. 3 - hexagonal frame
This house is a variant of the previous building with some features. It differs in that the log house is not traditionally quadrangular, but hexagonal. Roof slopes vary in length, so it has an asymmetric appearance. The well is small in size, but its compactness allows you to use the structure with a lack of space. A practical and at the same time decorative element is a wooden wheel.

A decorative element - a wooden wheel - can be replaced with a handle for convenience
This house can be used to decorate a mine with a pump or just to decorate the house area.
Building characteristic:
- height - 220 cm;
- base diameter - 120 cm;
- for construction, a rounded bar with a diameter of 100 mm is required;
- the gable roof is covered with edged board;
- the tree is treated with a moisture-proofing compound on all sides.

Drawing of a well with an equipped head and a house
Examples of decoration of well houses
There are several ways to decorate a building. The traditional way to decorate wooden structures is carving. A neat carved house for decorating a well in the classic Russian style is suitable for all summer cottages where a tree was used in the construction of the main house.

The base and the roof of the house for the well are decorated with carved elements, painted in a contrasting color.
Decorating takes place by coloring wood in various colors. Using impregnations or varnishes of different shades, you can give the structure absolutely opposite shades - from sunny yellow or whitened to dark brown, deliberately aged.
A selection of 6 unusual ideas for decorating a well in a country house will also be useful: //diz-cafe.com/voda/oformlenie-kolodca-na-dache.html

Carved house for a well decorated with a wooden figure of a bear
Sometimes an additional decoration is installed on the log house - a wooden or ceramic animal figurine.

Well house with a decorative element - a wheel for a gate in "marine" style
Of course, any country house building is not just a decor, but also the embodiment of a person’s views and taste, therefore, every owner knows how to make a house for a well so that it is practically useful and reflects the personality of the owner.