How can I diversify the rest in the country, make it easy, fun and enjoyable? There are many ways, and one of them is the installation of a swing in the garden or on a specially provided playground. Whether it will be a separate building or fixture in the gaming complex - it does not matter, the main thing is that it brings a lot of joy and positive. To save money, and at the same time to please your loved ones, you can build a garden swing with your own hands: they will favorably differ from the purchased models by the originality of the idea and exclusive decoration.
Design and installation choice
Before you start creating a sketch, you need to answer two questions: where will the structure be installed and for whom is it intended? Depending on the answers, they make an estimate, prepare a drawing of a garden swing, select tools and material.

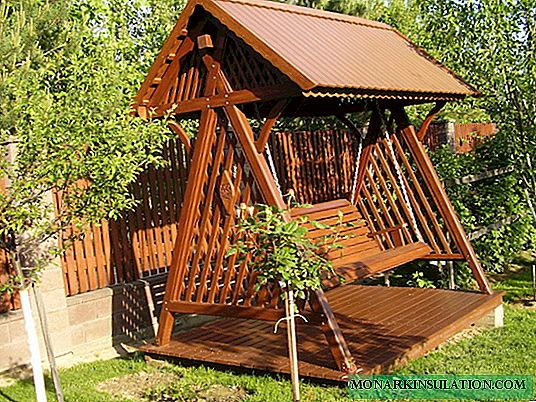
A swing located on the street is often equipped with a canopy, which serves as protection from the sun (rain) and at the same time is an interesting decor

One of the simplest constructions is a swing on A-shaped supports with a seat-strap
There are a lot of solutions, so for convenience, all products can be divided into three categories:
- For the whole family. This is a large-sized structure, often in the form of a bench with a high back, which can accommodate several people. The product is suspended from a sturdy U-shaped frame using chains. A small canopy on the cross beam allows you to use the swing in almost any weather.
- Baby. Quite a diverse group: here are frameless products, consisting only of a suspension bracket and a seat, and strong structures with a seat in the form of an armchair, and large structures such as “boats”. Wireframe models are safer. On any type of swing for the smallest children, straps should be provided.
- Wearable. Mobile swings of this type are usually suspended indoors: in the house, on the veranda, in the gazebo. They can be removed at any minute and installed elsewhere.
Each of the listed species has its own advantages and can be used in the country for relaxation and entertainment.
Swing bench: step by step instructions
To swing alone is certainly boring, therefore, we present an option for a fun company - a swing in the form of a wide bench on which several people can fit.
The proposed parameters can be changed - for example, to make the seat wider or narrower, the height of the backrest is slightly larger or smaller. The main thing is that you can comfortably sit and relax. These swings are designed for a garden or relaxation area, both children and adults can use them.

Based on the bench seat, you can invent various design options for the swing as a whole

Swing sofa is suitable for both relaxing with a book, and for a fun conversation with friends
A summer swing can be suspended from a large horizontal branch, but it is better to install two pillars with a transverse beam specially for them.
Preparation of materials and tools
If construction was recently conducted in the country house, there will be no questions in the search for materials - after all, everything you need is at hand. Wood is best suited for manufacturing - a material that is soft and malleable in processing, but strong enough to support the weight of several people. Birch, spruce or pine are perfect for both characteristics and cost.

Boards - suitable and inexpensive material for the construction of swings
So, the list of materials:
- pine boards (100 mm x 25 mm) 2500 mm long - 15 pieces;
- board (150 mm x 50 mm) 2500 mm - 1 piece;
- self-tapping screws (80 x 4.5) - 30-40 pieces;
- self-tapping screws (51x3.5) - 180-200 pieces;
- carbines - 6 pieces;
- welded chain (5 mm) - height swing;
- galvanized screws with rings - 4 pieces (pair 12x100 and pair 12x80).
Metal parts and screws can be combined in color with wood or, conversely, be contrasting (for example, black).
For the construction of a garden swing made of wood, traditional tools for processing this material are suitable: a drill with various drills, a circular saw, a hammer, a jigsaw or hacksaw, a planer. The square, tape measure and pencil are useful for measuring workpieces.
Procedure
From boards should be sawn off pieces of a half meter. The corners of the workpieces should be straight.

Thanks to the precise layout, the swing will be smooth and beautiful.
The thickness of the finished strips should not be less than 20 mm. The load on the back will be much less, so a thickness of 12-13 mm is enough. The approximate number of trims for the seat (500 mm) is 17 pieces, for the back (450 mm) - 15 pieces.
To protect the wood from cracking, holes for self-tapping screws are drilled with a drill, choosing a thin drill. The depth of the hole for the self-tapping screw is 2-2.5 mm.

Holes for screws to save wood
To make the seat and backrest comfortable, it is better to make the details of the base on which the slats are attached not curved, but curly. To make them, you need the thickest board (150 mm x 50 mm). Thus, six curly parts for the frame will be obtained.

The contours of the future part, applied to the workpiece with a pencil or marker, will help to precisely cut it.
Having chosen the required angle of the back and seat connection, it is necessary to combine the details into the frame and fix the strips one by one, making the intervals between them the same. First, the ends of the parts are attached, then the middle.

Having beaten first the central level, it is easier to align other elements
The armrests are made of two bars of arbitrary width, then fixed at one end - on the seat, the other - on the back frame.

Finished swings must be varnished or painted.
The best place to mount the screw with the ring is the lower part of the armrest strut.

Place of fastening of a ring for a chain
To prevent the nuts from completely entering the wood, use washers. Similar rings are screwed to the upper beam, on which the swing will hang. The chain is attached to the rings with the help of carbines - the place of rest and entertainment is ready!
Simple swing with different seat options
A simple and versatile option is the side racks for the swing, on which you can hang various types of seats. Let us dwell in more detail on the installation of the holding structure.

Part of the chain can be replaced with cylindrical wooden blocks
Material and tools for construction are the same as in the previous description.

One of the seat options is a sofa for 2-3 people
Externally, the design looks like this: two racks in the form of the letter "A" connected by the upper crossbar. To begin with, it is important to calculate the angle of connection of vertically standing parts. The greater the width of the intended seat, the wider the racks should be placed. Bars (or poles) are fastened in the upper part with bolts - for reliability.

Stands for supporting structure
So that the vertical elements do not diverge, they are fixed with crossbars at a height of 1/3 of the ground. When installing the crossbars will be parallel to each other. The best mounts for them are the corners set on self-tapping screws.

Fixing the carrier beam with additional elements
Usually one pair of crossbars is enough for a coupler, but sometimes a second one is also made in the upper part of the structure. Together with them, they strengthen the place of attachment of the upper crossbar - metal or wooden plates in the form of a trapezoid are mounted on the inside.

Cross bars increase stability of the supporting structure
A support transverse beam is mounted on the finished side racks, and then the structure is installed in the ground. To do this, dig two pairs of pits (at least 70-80 cm deep - for greater stability), at the bottom of which they arrange pillows from crushed stone (20 cm), insert racks and fill them with concrete. To check the even horizontal location of the upper beam, use the building level.

For the smallest summer residents, an armchair with insurance is suitable
The upper crossbar can be equipped with fixtures mounted on different widths, as a result we get a design on which you can hang various swings - from simple rope to family sofa.
Material on how to make a hanging chair with your own hands can also be useful: //diz-cafe.com/postroiki/podvesnoe-kreslo.html
Some useful tips
When installing a children's swing, you should remember that safety comes first, so all details should be carefully sanded with sandpaper. For the same reason, wooden elements should be "without a hitch, without a hitch" - defective wood is not suitable for supporting structures. Sharp corners must be smoothed out with a file.

For fast wood processing use a grinding machine
It is also worth taking care of the swing itself. Processing by impregnation, finishing with paint or varnish will extend the existence of the structure, and galvanized fasteners will avoid the destruction of wood from the inside.
Photo gallery of original ideas
Since you will do the swing yourself, you can dream up and give them a certain originality. Of course, decorating a product is a purely individual solution, but some ideas can be taken from finished designs.