Starting the construction of the house, many owners immediately start a dog, especially if the construction is far from temporary housing. But, thus solving the problem of protecting the site, one should take care of a comfortable home for the faithful "servant". You can, of course, make a booth and put the dog on a chain near it, but this option is only suitable as temporary housing. So that the animal does not hurt and feels normal, it is necessary to build an aviary for the dog with your own hands or buy a finished structure, which can also be assembled independently.
The basic elements of dog housing and the rules for their installation
Before you build an aviary for a dog, you need to familiarize yourself with the existing standards for such structures. If you build an aviary without taking them into account, then housing can become a breeding ground for diseases for the dog and a source of danger for everyone who enters your territory (for example, when the dog easily knocks the door open and pops out).
We will analyze each element in the design of the aviary and the requirements for it in more detail.
Step 1 - determine the size of the aviary
In the design of enclosures, the main parameter is the length. It is selected taking into account how tall your dog will be when it grows up. If the dog is still a puppy, then its adult size can be determined by the width of the paws, chest, etc. Information on this is full on the sites of dog breeders.

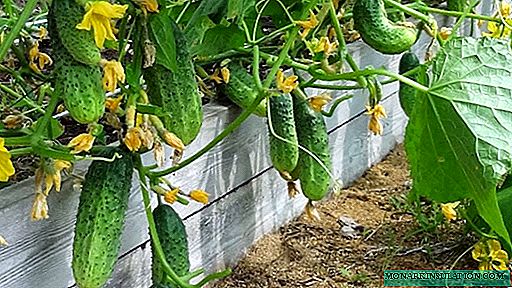
A convenient option is the enclosures attached to the outbuildings, because the back wall is provided with reliable protection from the wind
For small dogs, the height of the withers of which does not reach half a meter, create six-meter aviaries. For animals with growth from 50 to 65 cm - eight-meter. Large pets will need a ten-meter design. Such standards are designed for dogs that will be in the aviary around the clock. If the owner plans to let the animal out at night, and sometimes take walks during the day, the construction of the dog’s enclosure can be a little shorter (1-2 meters). If on the site it is planned to keep two dogs or puppies are expected at the bitch, then the aviary is made one and a half times longer.
Step 2 - select the floor material
The floor in the aviary is made of concrete or asphalt. Most often, the owners choose the first option, because it is easier to fill it yourself. But it should be remembered: concrete adheres strongly in the cold season, and the dog can "earn" paw rheumatism. Therefore, concrete floors are laid on top with a plank flooring (a square of 2 * 2 m is enough).

On a warmed gravel concrete base the dog will be much warmer than on cold ground

Instead of a solid foundation, you can pour only a spot, leaving ordinary grass for walking
When pouring, it is necessary to make a bias to the facade so that moisture and precipitation do not remain in the aviary puddles, but flow down. In addition, it will be easier to remove the structure, because water from the hose will easily wash dirt to the edge. It remains only to collect it on the scoop.
Step 3 - wall mounting
When starting the construction of a dog enclosure, remember that one wall, preferably a facade, should look like a grate so that the animal can observe the area entrusted to it. It is best to weld it from pipes (except galvanized, because they are harmful), having carried out the appropriate treatment: clean from rust, prime, paint.
When you weld the frame, make sure that the elements are not just grabbed, but welded securely, otherwise, with a strong push, a large dog will easily knock out a fragment of the wall. At the weld points, check for burrs. Never replace pipes with a net, because the animal will do its best to gnaw at it. A metal mesh will spoil the dog’s teeth, and a plastic or braided one will not endure the onslaught and will burst.

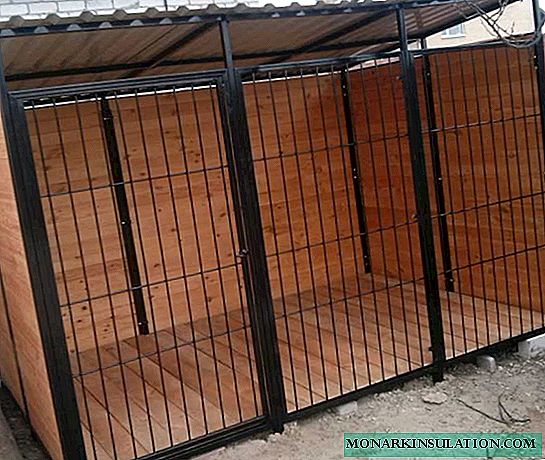
The walls can be made of profiled sheet, but the grid should be replaced with pipes
The other three walls are made of any material at hand: boards, slate, metal profiles, etc., although for the health of the animal it is best to build from wood. When buying boards (thickness - 20 mm), check the quality of processing: for cracks, knots. The board should be smooth. At home, coat the tree with an antiseptic compound in advance.
Step 4 - lay the roofing
The rafter system must be reliable and well sanded. The roofing can be laid any that is available, although soft materials, for example, shingles, are preferred for dog ears. She conceals too loud noises during rain or hail, annoying the dog. An important point: the roof is mounted without nails!

The absence of a roof will make the dog sit all day in the booth if the weather is cloudy
Step 5 - installing the door
The door is made in the lattice wall, which faces the facade. The most important rule: the doors must open inside the enclosure and have 2 locks (outside and inside). Be sure to add eyes to the design, which will come in handy if the main constipation fails. Then for a couple of days it will be possible to use a padlock.

An important detail is forgotten behind the external beauty: the door must open inward, because if you forget to lock it, the dog will easily jump out of the aviary
Rules for choosing a good booth
An enclosure for dogs must include a booth. It serves as a dog protection in frosty or windy weather. If you build a booth with your own hands, then some nuances should be taken into account:
- The area of the booth should correspond to the size of the dog. Inside, there should be enough space only for a U-turn and rest in an extended position. Too spacious structures in areas with harsh winters do not keep heat, so the animal will constantly freeze. In a mild climate, the internal volume of space does not play a special role.
- For the walls of the booth, conifers are ideal, which have disinfecting properties and keep an optimal microclimate. The wood must be thoroughly dried.
- In places with a harsh climate, it is better to make the walls double by laying a layer of insulation between it. And if strong winds often blow in your area, then clog the wall from the side of the wind with some windproof, moisture-resistant material.
- Before installing the roof, it is necessary to build the so-called ceiling - the base of the boards, which will keep heat inside the booth.
- Make the roof removable. This will facilitate cleaning inside the booth, and if the dog gets sick, you can get it through the roof to help.
- Mount not a gable roof, but a flat one with a slope. Dogs like to sit on their own booths, as at an observation post.

The enclosure must have a removable flat roof.
Article in the subject: Do-it-yourself doghouse: building an insulated structure
How to carry out installation on your own?
Those who carefully read the above instructions and decided to create an aviary on their own will need a welding machine and the ability to work with wood. And a few recommendations below will help you not to miss anything. We will not talk about the design and coloring of the structure, because this is not essential.
Consider some aspects of installation on the example of a 2 * 4 m building, designed for a small dog, which will periodically be walked:
- Before you begin, outline the construction plan, where apply all the structural elements of the aviary and their parameters. Of the 4 meters of length, one and a half should take a winter road (or booth), another one and a half - a platform. Take the meter to an open area.
- An aviary is best located in the southeast. Do not turn to the north, otherwise the booth will constantly clog with snow, and to the south, because the dog will languish in the summer from the heat.
- We fill the entire foundation with concrete, and in the part where the platform and the winter road will be located - a plank flooring on top of the stela. If we are building an aviary for a dog with a booth instead of a winter road, then we lay the boards only in the part of the platform. At the same time, the flooring should not fit snugly to the concrete base. Leave at least 5 cm between them so that air circulates normally and the tree does not rot. It is best to fill the bottom of the legs.
- The booth must also have ventilation. To do this, they put it on bricks.
- The front wall of the pipes is welded in increments of 10 cm for large animals, and 5 cm for small ones.

The layout of all parts of the aviary depends on the size of the dogs.

Fill the plank flooring so that air can walk between it and the concrete base
If you make dog housing according to our recommendations, then your pet will receive a real "comfortable apartment" and will thank you with a good service.