There comes a time when a tree that for many years bears fruit or simply delights you with its spreading crown has to be cut. As a result, a slightly sympathetic stump is formed in its place, with which you need to do something. You can, of course, uproot him, but often such work requires serious physical effort. After all, the root system of the old tree remains branched and very strong. If you also don’t feel like digging a pit to extract the root, you just have to figure out how to decorate the stump in the garden with your own hands.
Idea # 1 - “stump on a spring day”
Of course, the old stump itself will not bloom, but this does not mean that flowers cannot grow on it. This really happens if you plant low annual flowers, grassy or even ornamental plants on a stump. Their presence will ennoble and revitalize the saw cut of the tree.

All these modest flowers look very impressive in a single bouquet, which, like a vase, holds the simplest stump
To bring this idea to life, you need a minimum of costs. We align the surface of the stump, after which we make indentations in the stump. They must be such that the root system of your chosen plant can develop unhindered. A landmark may be, for example, a flower pot.
You can simply make one recess in the stump if you remove the core from it. This is not difficult to do when we are dealing with rotten hemp. Of the tools we will need a saw or chisel with a hammer. If the stump appeared on your site relatively recently, it is better to use the method of core burning.

Surely such a stump will become a real decoration of your garden at the very beginning of the last spring month and on the eve of summer
A sufficiently deep hole must be drilled in the center of the stump so that kerosene can be poured into it. In this case, the side surface should not be less than 7 cm, so that after removal of the core our structure remains intact. Fill kerosene and plug the hole in the stump with a stopper.
After about half a day, add kerosene and close the cork hole again tightly. Leave the stump alone for one to two weeks. Then remove the cork and light the core of the stump. When it burns out, the resulting flowerpot should be treated with an antiseptic so that the flower bed lasts longer.
Drill holes inside the recess to prevent stagnation of water. Now we put inside the garden soil mixed with nutrients, after which we plant seedlings or bulbs. When a magnificent cap of flowers forms on a stump, it will not look old and unsightly at all.

If you are not sure of the strength of the walls of your new flowerpot from a stump and are afraid that they may begin to crumble, they can be reinforced with a mesh
You can see the most different options of what you can do with your own hands from a stump in the country in this video:
Idea # 2 - stump like garden furniture
To make some interesting thing, for example, a piece of furniture, out of an old stump, you need a good tool and some skills of similar work. But tools today are not a problem. And about skills, you can say this: all the great masters were once apprentices. Therefore, we will at least try. What do you risk in the end? Only an old stump.
Option # 1 - a stump in the role of a chair
Suppose you just outlined a tree under a saw cut. It would be nice if he had a thick trunk. We remove branches, moving from thin upper to stronger lower. Now that you have the barrel in front of you, you need to mark it up.
If we want to make a chair, it is more convenient to place the seat at a height of 40-60 cm from the ground. Let's say it will be 50 cm. Put a mark in chalk at this height. But the chair still has a back. We add another 50 cm to it. At a height of 100 cm, we also put a mark with chalk. At this mark, a cut will take place, which is best done with a chainsaw.
You can learn how to cut a tree with a chainsaw correctly from the material: //diz-cafe.com/ozelenenie/kak-pravilno-spilit-derevo-benzopiloj.html

It is difficult to say how much the armchair shown in this photo has a natural origin, but it is it that well illustrates the result of the work described in this section
Now we will form the back of the chair. To do this, we need to make a horizontal cut at the seat level. That is, where our first mark is located in chalk. We make a cut to a depth of 2/3 of the trunk. Saw from the side in which the chair will be turned in the future.
To form the back, we will make a vertical cut from above until we reach the previous horizontal one. We remove the piece of the trunk cut in this way.
The base is created, you can proceed to the decorative finish. For this work, we will need different devices from a grinding machine to a chisel. It all depends on how exactly you decide to decorate the resulting chair. In any case, this is no longer a stump sticking out in front of everyone, but a comfortable chair, sitting on the seat of which you can relax.
Option # 2 - the original table
When you made a chair, you chose not to part with the tree bark. Now we have to make a garden table, the stump of which will be the leg. And this time, it’s better to get rid of the bark. For this we can use a chisel or a chisel. We will work as carefully as possible: after all, we do not want to damage the wood.

In this photo you can clearly see exactly how to nail the holders to which the countertop will be attached in the future
On the side of the stump we fill two perpendicular wooden planks. We fix on them four holders in pairs perpendicularly fastened among themselves. We make worktops from boards, and fasten them together with planks.
The countertop can be made round. To do this, it is enough to draw a circle, using for this purpose an impromptu compass from a pencil, rope and nail. We drive a nail into the center of the countertop, to which is tied a rope with a pencil on the end. We outline the circle and delete everything that went beyond its borders.

A tabletop mounted on a leg that was once a stump needs to be treated with special protective compounds, and it is better to close such a table for the winter
We nail the finished countertop to the holders with nails or fasten it with screws. The finished product must be impregnated with a protective solution that will prolong its life.
Idea # 3 - funny compositions
Option # 1 - an unusual sculpture
Implementing the following idea is not at all difficult. And now the dry skeleton of your tree is sawn by little men, similar to green grasshoppers. It’s easy to make such kids yourself using wire, pieces of tin or plastic for this purpose. Similar fairy-tale characters can be purchased at a store selling souvenirs and toys.

The figures are made very deftly, and the whole composition leaves an amazing positive impression: the little men need to be fixed securely so that they are not incapacitated by bad weather
These funny figures can be fastened to the barrel with the help of self-tapping screws, wire or clamps. Such a comic composition will decorate your garden and will attract the attention of your friends and neighbors.
Option # 2 - decorative fly agaric
If you think that making a fly agaric from a stump is easy, then you are absolutely right. All that is needed is an old enameled or iron bowl and aerosol. The bowl needs to be cleaned and painted with red paint from a spray can. After it dries, draw white circles on a red background, exactly like the specks on a fly agaric hat.

Next to the handsome fly agaric, you can put numerous other items that help revitalize the composition, make it complete
The stump also needs to be painted white. It would be nice to draw a funny grinning face on it. But here it’s how the fantasy will tell. It remains only to put on an elegant hat on the leg and boldly declare that the fly agaric is ready! By the way, it is not necessary to make a fly agaric. It can be a cep. Just fly agaric looks more elegant.
To complete the picture, we suggest you lay pebbles, for example, green in color at the foot of your mushroom. They, like the frame of a picture, will create a border for your work. However, you can do without them.
Using stone paintings, you can also make an original element of decor. Read about it: //diz-cafe.com/dekor/rospis-na-kamnyax-svoimi-rukami.html

These porcini mushrooms are also made of hemp, but in a completely different way: both the leg and the cap of the mushroom are carved from the wood of the stump itself and painted in appropriate colors
Option # 3 - a fabulous teremok
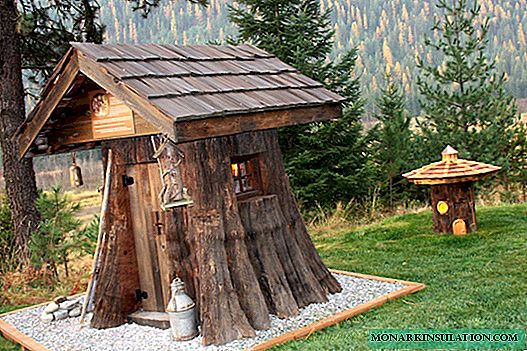
If a person is not deprived of imagination, then even from a dry stump he is able to make a whole work of art - a fairytale castle or a tower, inhabited by the most amazing fairytale characters. Such a craft can become the pride of the owner of the site, if you work on it with your soul.

A cute Japanese-style house is complemented by a small hut, most likely for a traditional tea ceremony
The stump itself can serve as the main part of the castle, on which all the additional decor will be attached. In order not to miss anything, we suggest making a sketch of the future structure and subsequently try to follow it.
Decorating details can be sawn from a piece of fiberboard or plywood. They should be attached to the stump using self-tapping screws. All components must be impregnated to protect them from decay. In addition, they can be painted in the desired color.
Also, material on creating crafts from plywood for decorating the garden can be useful: //diz-cafe.com/dekor/podelki-iz-fanery.html

Such a cute house with figures will be very popular with children, who will undoubtedly immediately adapt it for their fun games.
Sometimes in a trunk of a dry tree, quite low from the surface of the earth, hollows, outgrowths are located. All these details, despite their natural origin, are easily used in the composition. For example, small toy stairs with funny gnomes hanging from them can hang from the hollow. And on the growth you can place a toy piano with a squirrel pianist.
Do not forget to pay attention to the roof of the structure. For her, an old leaky bucket will fit perfectly. By the way, artificial or living plants knocking out of a hole in the roof of such a structure will look very attractive.
This video is dedicated to a variety of characters made from stumps:
Idea # 4 - decorate the stump with potted flowers
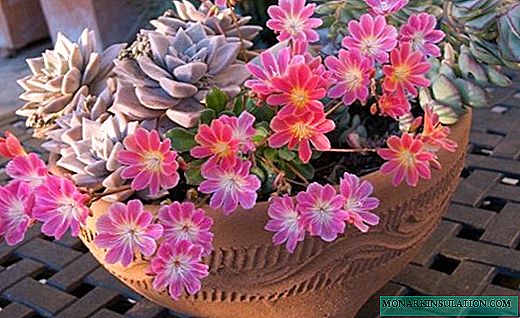
We have already told how you can decorate a stump with flowers that are grown in it, but there is another option for such decoration. If several branches are preserved on a stump, you can hang on them the same flowers, but grown in pots. They can look very impressive.
Even if there are no branches, a flower pot can be placed on or around the stump itself, creating a special aura of flowering and ongoing life. Hemp looks great as a decorative stand for flower pots with plants, if they are well sanded, allowing the wood to show its texture.

Despite the simplicity of this composition, it looks very impressive and accentuated in a rustic way: for a country style, it fits perfectly
But at the same time, do not forget that a tree located in an open area needs protection - impregnations that will withstand decay.
Idea # 5 - garden sculptures
Everyone can create garden figures from stumps, only real artists as a result produce wonderful works of art that are striking in their realism. If you are guided by a desire to simply decorate your site, then you can create a simple image that does not require special skills.

Of course, this magnificent deer, voicing in the spring forest, is skillfully carved from an ordinary stump by a high-level professional
Making a simple stump figure is not at all difficult. Those who sculpted snowmen in childhood can apply the accumulated experience in this case. The role of the hands will be performed by twigs, instead of the nose and mouth we add knots, Eyes can be made from brown bottoms from plastic bottles. The cork from the same bottles will play the role of the pupil.
All this is attached to hemp with self-tapping screws. On a horizontal saw surface, you can simply lay out pine cones that will mimic hair. Here is such a caretaker for the garden, which we have whipped up, is ready.

But any schoolboy can make such a funny watchman for a summer residence, and it is for this that such a garden sculpture is appreciated
If it happened that you had to cut down a number of country trees, do not be sad. This situation has its positive side. But now you have a large number of stumps located nearby from each other. And this is not bad at all. Make a fairy-tale country out of them for your children, putting into practice all the information that you have already received in this article.
It will be just a great place to play. First you have to clean every stump of bark. For this you need a chisel and a hammer. The bit must be inserted between the bark and the tree trunk, and then gently tap on it with a hammer. The bark will move away from the trunk and soon its stump will completely lose. Now it can be thoroughly sanded using sandpaper with medium grain for this purpose.

Such an owl could easily become a companion of Baba Yaga herself and settle in her hut, flying out of her from time to time to hunt
Be sure to remove the wood dust resulting from the operation with a damp cloth. A tree prepared in this way should be treated with an antiseptic that will protect it from decay.
Now you can start decorating the stump. Choose a big stump to turn it into the real house of Baba Yaga. Take chalk and outline the location of future windows and doors of the grandma’s hut. Wood recesses for doors and windows can be made using a chisel and a hammer.
We will need pieces of boards from which we have to make doors and shutters on the windows. These details of the future structure can be painted right now, while they are not pinned into place. Nails and shutters should be nailed to the places indicated on the stump with nails whose hats are bitten off. Finishing the decoration of the hut, you can collect twigs and snags of an unusual shape in the district to stick them around Baba Yaga's house. Let depict the dense years.
On smaller stumps, you can depict the heroes of various folk tales or funny cartoon characters. You can decorate these stumps and draw conceived heroes on them using paints for outdoor works. The images outside will wonderfully complement the flowers planted right inside the stumps. How to do this was described in detail at the beginning of the article. You can limit yourself to pots with plants.

Another wonderful composition, performed by a professional artist and sculptor, creates an excellent mood inherent in a small fabulous corner of your garden
We’ll turn a couple of stumps into children's chairs. For this, we will not even cut a massive back. If you still have old chairs, take their backs for this work. They should be carefully freed from varnish, and then, using ordinary nails, nailed to the seats from the stumps. Ready-made chairs can only be painted in bright colors that children will definitely like.
Just turn the small remaining stumps into a flock of fly agaric, using bowls or basins of the appropriate size as their hats.Now you know exactly how such mushrooms can be made. Everything, improvisation on a fairy tale theme is ready.
Idea # 6 - The Green Monster
Another idea of how you can refine the stump may also interest you. For this purpose, you need a hefty stump with a powerful root system that lurks in a shady place. If there is one on your site, you can consider yourself lucky.

The big stump covered with moss looks mysterious, as if it got into your garden directly from Twilight or some other saga
Buy a moss variety suitable for your climate in the store. You need to plant moss on a stump. To get it started, you will periodically have to spray it with water. Now it’s important that the moss grows. When this happens, you will be able to fully appreciate the grandeur of the resulting creation.