Happy are those whose garden is filled not only with flowers and all kinds of decorations, but also with fervent childish laughter. Children are the main lovers of country adventures. We are trying to take them away from city noise and smog, so that they can enjoy nature and breathe fresh air. But it’s not enough to bring a child to the cottage, he needs to be occupied with something. A do-it-yourself sandbox in the garden is a great place for children's games.
1024x768
Normal 0 false false false
Rules for the placement and construction of the sandbox
Creating a sandbox for your child and his friends, you must be guided by the basic principles of its placement:
- Providence. Children should be in the field of view of adults, so you need to place the sandbox so that it is clearly visible and accessible.
- Hygienic requirements. It is not worth placing a place for games under the trees, otherwise not only falling leaves, but also bird droppings will create unnecessary problems.
- Protection. Direct sunlight does more harm than good, so sun protection should definitely be considered.
- Ease of use. When calculating the size of the structure, it is necessary to take into account the approximate number of children who will use it.
There are standard norms for children's facilities. The design is made of wood, as the most environmentally friendly material. Usually this is a square, the side of which is from 2.5 to 3 m. Sand to fill such a structure requires approximately 2 m³. If you make a standard sandbox, then as a material for it you need to take pine boards 25-30 mm thick.

It is important to observe the basic principles of sandbox placement, then your child will play with pleasure, but under supervision and in a place protected from the sun and debris

A fairly standard-looking sandbox, but it has everything you need: the child is under mother’s supervision, the surface of the structure is processed, and the sides make the game more convenient
The process of building a standard sandbox
When thinking about how to make a sandbox with your own hands, you should initially determine the type of future structure. If the design is standard, then it’s enough to select a plot of about 2x2 m in the garden, free from overhanging tree branches, and you can begin to create a future place for games.
Prepare a place for installation
We will be realistic and choose a structure with a size of 1.7 x 1.7 m. For two or even three kids, such a sandbox will not be small, but there will be little space in the garden.

It’s not difficult to mark out a sandbox area, you need to have four pegs, several meters of twine and a tape measure to correctly measure the distance
The site for the future construction must be prepared. For this purpose we take a cord and pegs. We mark the perimeter of the sandbox and dig a hole 25 cm deep inside the fence. The fertile layer that we removed is very useful in other parts of the garden. So, the platform turned out 170x170x25 cm.
Sandbox Base
You can limit yourself to digging a hole, but the earthen base of the sandbox will create problems in the future: the sand will quickly lose its original appearance, will be dirty and will often have to be changed. It is better to think in advance about how to make the garden sandbox as clean as possible. A dense base that will not allow mixing of earth and sand is an excellent way out of the situation.
A sand cushion will help level the surface of the soil. Pour sand to the bottom of the pit. A 5cm layer will be enough. The sand must be well compacted, after which it is covered with special material.

In principle, paving slabs can also be used as a base, but sand covered with geotextiles is no worse, and there is less trouble with it.
Geotextiles or agrofiber - modern materials with which you can find a quick and elegant solution to the problem. If you take, for example, polyethylene, then the protection will be airtight, but, after the first rain, the structure will have to be dismantled due to accumulated water. Geotextiles are excellent moisture permeable: all the water just goes into the ground. But neither moles nor insects that live in the earth will be able to break through to the top. If you use a film or plywood, then you need to make drainage holes in them.
Little left: start and finish
We prepare bars of 450x50x50 mm. They will be located at the corners of the structure. Given the fact that a portion of the bar at 15cm in length will be in the ground, these parts must first be treated with an antiseptic. In this quality, bitumen is wonderful. The bars are driven into the ground at the corners of the future sandbox.
For each of the four sides of the structure we construct a shield from pine boards. Its width is 30 cm, and its thickness is 2.5 cm. You can take one wide or several narrow boards - this is not important. It is much more important to carefully treat the surface of the shields so that there are no knots, no bulging chips, no nicks. We definitely don’t need splinters and scratches!

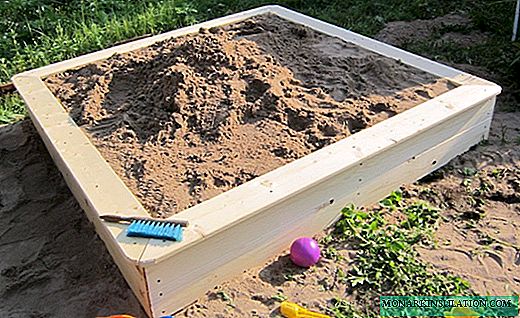
The sandbox is almost ready, and the sides give it a completely finished look; only a few final touches remain, which we will discuss below
It should be convenient for children to play, for this you can make sides in the design. Along the perimeter of the structure we lay 4 boards, which are also prudently planed and viewed. The children will be able to use beads as seats, as showcases for pies or stands for pails, molds and shoulder blades.
Small but useful additions
Cover - a measure of protection
We will slightly upgrade the standard version and add a cover to the finished structure. Sandbox with a lid - an option for prudent parents. Why do we need such an unusual detail? Everything is simple, using the lid we:
- protect the sand from rain;
- we will not allow the wind to bring here leaves and other possible debris;
- let's not let cats and dogs into the building: let them look for another place for the toilet.
So, we came to the conclusion that the lid is necessary, so we will make a wooden shield, securing several boards on the bars. It will need to be lifted, and cleaned before the game. But the baby will not be able to do this on his own. It is worth thinking about a lid-door, which can consist of two parts. For it, you need to make two shields of the appropriate size and fix them on the hinges. Equipped with handles, such doors can be opened even by a child.

Such a creative building is equipped with a convenient lid: even a child can open it, and it can also transform into benches
If the procedure for constructing the lid was impossible for some reason, you can limit yourself to an awning or a film. Mounted on an elastic band or just bricks, these canvases will perform the main function - protective.
Canopy or fungus
The fungus is an element without which the creation of the sandbox of our childhood could not do. This rather decorative detail carries a certain protective function. Under the fungus, you can wait out the sudden rain, and it protects the kids well from the sun. Often a table was attached to the base of the fungus, which performs the same function in the construction as the sides.

A sandbox with a fungus is a safe and convenient construction for the game, in which there is nothing superfluous, and there is everything you need
Let's stop on wood as the most reliable material for children's facilities. For the leg of the fungus, take a bar 100x100 mm. Approximately 3 m of beam length will be sufficient. Indeed, for greater stability, the leg of the fungus should be dug into the ground to a depth of at least a meter. Do not forget to treat the leg of the structure with an antiseptic. For mushroom caps, we make triangles from the boards in advance. From the inside, they should be nailed to the leg of the fungus, and from the outside sheathed with thin plywood. Width for the hat within 2.5 m will be sufficient.
Of course, this kind of canopy is not the only one that can be built over the sandbox. The imagination of man is limitless, and other options can be devised, no worse.
Choose the right sand
Usually for children's games choose river sand. It is believed that it is the cleanest and contains a minimum of impurities. The quartz sand purchased at a building materials store is also good. Any sand requires screening. You never know what can get into it and ruin the child’s pleasure.
By the way, there are even special sands for children's constructions, from which it is more convenient to sculpt figures: they have a high clay content. Special flavors are added to this material, which can deter unwanted visitors to children's sandboxes - cats and dogs.
One could still talk about all kinds of ways to decorate the sandbox, but let the imagination of the parents complement this article with original ideas. Now you know how to make a cozy children's sandbox. It is possible that the structure in your garden will become a real highlight of subsequent publications.