Not every owner of a country house has the opportunity to build a gazebo on the site, in which it is pleasant to spend time enjoying the rest. A wonderful alternative to a traditional gazebo will be a tent for a summer residence. A convenient design that protects the owners and guests at sultry noon from scorching sunlight or on a cloudy day from raindrops can be purchased at the garden center. However, for such a pleasure you have to pay a decent amount. Therefore, it makes sense to try to build a tent for a summer residence with your own hands, which organically fits into the existing architectural ensemble.
The main purpose of the tent for a summer residence is to provide additional comfort for outdoor recreation, whether it is a noisy pastime in the company of friends or a relaxing holiday alone with nature. And the main advantage of the awning is that at any time it can be transferred without any hassle to any convenient place, placed near the pond or installed on the lawn in the garden. The tent is quick to set up and easy to clean. A lightweight collapsible design can even be taken with you on the machine anywhere.
Depending on the size of the tent and the main purpose of the structure, it can be: stationary or folding, in the form of a spacious gazebo or a more compact tent. Tents can have 4, 6 and even 10 faces, forming square or rounded polyhedral structures.

Garden tents and tents are universal structures, under the arches of which a whole company or a large family can easily be placed

The variety of models is vast, ranging from simple awning options in the form of pieces of fabric stretched between the trees, and ending with real tents of the "Sultan"
Regardless of the model, a mandatory design detail is the presence of protective "walls" on the three sides of the tent. They are made of fabric material. The front wall of the awning is hung with a transparent mosquito net that protects from annoying flies, wasps and mosquitoes.
Suitable place is half the battle
When planning the arrangement of a garden tent or tent, it is first necessary to determine the location of the future structure.

The best option for placing a summer tent is an open flat area in the garden or directly next to the house against the background of an elegant flower garden
The area where the tent is supposed to be installed must be cleaned of plants and roots, debris and stones. The surface should be smoothed as much as possible and tamped if necessary. When planning to build a simple lightweight structure, it is enough to mark the territory and prepare the recesses for the placement of support columns.
When arranging a stationary structure, you will need to build a foundation and lay out the flooring. To do this, we remove a 10 cm layer of soil in the designated area, level the bottom and line the “pillow” of sand. Sand the water and carefully tamp. It is convenient to lay paving slabs or equip a wooden flooring on the prepared base.
Options for self-made tents
Option # 1 - stationary tent with a wooden frame
To build one of the simplest options for the tent you will need:
- Bars 2.7 and 2.4 meters high with a section of 50x50 mm;
- Wooden boards 30-40 mm thick;
- Fabric for a canopy and walls;
- Metal corners and screws.
Having marked the territory, we determine the place of digging in of the support posts. At the installation site of the support posts, we dig out a pit a half meter deep with the help of a rotator.

Pillars can simply be installed by falling asleep with a layer of earth. But to create a more reliable design, it is advisable to install them in prepared pits on pillows made of gravel, and then pour cement mortar
Before proceeding with the assembly of the tent, in order to prevent decay, we cover all wooden structural elements with paint or a primer. To equip a pitched roof, on which raindrops will flow unhindered, we make the front support posts 30 cm higher than the rear. After the mortar completely solidifies between the racks, we fix the horizontal cross-pieces, making connections using metal corners.
The frame is ready. It remains only to cut and sew a cover for the roof, as well as curtains for the decoration of the side walls.

If you plan to make the roof not of fabric material, but of polycarbonate, then you need to place rafters on top of the cross-members, which can also be made from a bar with a section of 50x50 mm
We lay and fix the crate on the rafters, on which we use cover screws to fasten the covering material.
Option # 2 - metal tent gazebo
To install such a tent on an attractive site, it is necessary to place four concrete disks or plates with a hole in the center at the location of the support posts. They will be the foundation of the design.

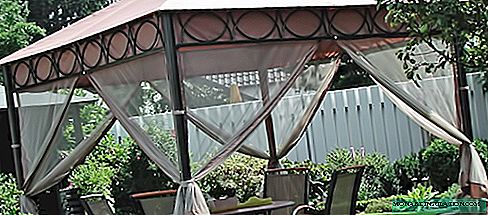
No less interesting will be the tent, which is based on a metal frame. Such a design will not visually look bulky and fit perfectly into the landscape design of the site
We install metal rods or tubes made of durable plastic tube in the holes of the disks. We connect the upper ends of the rods to each other with the help of wire or clamps, creating arc supports.
After the frame is assembled, we collect and fix the upper edge of the fabric, wrapping it with twine or wire, at the junction of the frame arcs. Then we straighten the fabric and pull it over the rods. Additional ties that can be sewn from the inside of the tent in places of contact with the frame will prevent the fabric from slipping. Around 3-4 racks, you can additionally stretch the mosquito net, leaving free space for entry.
Option # 3 - children's "house" for games
It will not be superfluous to take care of the youngest members of the family as well. For children, we offer to build a special children's tent. Such a "house" is able to freely accommodate a small company of 2-3 fidgets.

A cute tent, made in bright colors and decorated with appliques of fairy-tale characters, will become a favorite place for hanging out your kids
To equip such an elegant tent you will need:
- Plastic hoop d = 88 cm;
- 3-4 meters of cotton fabric or raincoat fabric;
- Velcro tape;
- Mosquito net or tulle.
The width of the base of one lower cone will be about 50 cm, and the length of the part will depend on the expected height of the tent. Between each other we sew only cone-shaped elements of parts "A" and "B". They are assembled into a single structure using six ribbons sewn at an equidistant distance along the edge, which we tie to the frame hoop.

From the selected fabric sections we cut out four identical details “A”, which will hang the lower part of the structure, and four details “B” for the upper part of the tent
At the junction of parts "A" and "B" we will place a frill made of fabric sections of contrasting shades. To fix the tent-cone and hanging it to the branches of a tree, we equip the dome with a loop with a ring.
For the manufacture of frills, strips with a width of 18-20 cm will be required. We fold the strip in half lengthwise, and outline the sizes of the semicircles on them. We draw a frill along the outlined contours, then cut off the allowances and turn the strip out. We make a loop from a cut of fabric 30x10 cm, which we also fold in half, sew and twist.

To fix the loop on the dome of the tent, you need to cut 4 small cones, between which we insert the loop and sew along with the details
The frame of the "house" is a plastic hoop to which the "walls" of the tent are hung using the ribbons sewn along the edge. We make the floor for the tent from two cuts of fabric with a diameter of 1 m, which we shorten together, laying a layer of foam rubber, and twist. On the outer perimeter of the floor in several places we sew the Velcro tape.
To the lower edge of the part “A” cones sewn together, we sew the tape and mark the places for attaching the Velcro tape, with which the bottom of the tent will be attached.

To equip the entrance, we outline the dimensions of the hole. From the mosquito net or tulle, we cut out the curtains and sew them from the inside above the overlap entrance. On the perimeter of the entrance we attach a wide slanting inlay of yellow fabric
We make patterns for the application from the same fabric, gluing the elements together using an adhesive web. We decorate the walls of the tent with appliqués, attaching them with a zigzag seam.